Friday, June 29, 2012

Quinoa Salad with Strawberries & Spinach

After a visit from my cousin this summer (and a fabulous quinoa salad), I started to cook with quinoa at least once a week. I love the nutty flavor and the fact that you can put it with just about anything. Not only is quinoa (keen-wa) a whole grain, but it provides all 9 essential amino acids, which makes it a complete protein (perfect for vegetarians or vegans). Quinoa is a gluten-free and cholesterol-free whole grain and it is almost always organic. 
This salad is perfect for summer and it packs a punch with antioxidant rich foods and enough protein to keep you satisfied!


Serves 2-3
Dressing Ingredients
4 Tbs olive oil
4 Tbs balsamic vinegar
2 tsp Dijon mustard
2 tsp real maple syrup
2 tsp shallot, finely chopped

Salad Ingredients
1 1/2 cups cooked quinoa, warmed
5 Tbs goat cheese, crumbled
black pepper and sea salt, to taste
1 1/2 cups strawberries, chopped
2 1/2 cups baby spinach, roughly chopped
4 Tbs pecan pieces

Instructions
1.  Cook the quinoa according to the directions on the packaging. Note that one cup of dry quinoa yields over 3 cups cooked quinoa.
2.  Combine dressing ingredients and whisk to combine. Set aside.

3.  In a small pan, over medium heat, toast pecan pieces until they are fragrant and golden (about 5 minutes).
4.  In a bowl, mix warm quinoa with goat cheese, salt and pepper. Mix in strawberries and spinach, drizzle with as much dressing as desired and mix well. Top with pecan pieces.

Thursday, June 28, 2012

Oat Cakes

In a continuous effort to please my toddler and please the "mommy in me", I have been trying to cook healthier, kid friendly foods.  Breakfast is the hardest time of the day for me to do this because we are all hungry, impatient and un-caffeinated, which is why I tend to pull out an Eggo waffle, pop it in the toaster and serve it for breakfast.  I do not necessarily think that there is anything wrong with boxed waffles for a 2 year old who will throw 50% of it on the floor, but I like to stay away from processed foods when I can.  Franny loves Manna Cafe's (a favorite local breakfast spot) Oat Cakes and I think that I finally have gotten the recipe pretty close. Not only do these pancakes taste delicious, they are a great source of whole grains. The recipe yields about 15  pancakes, so I usually put them in a freezer safe bag, pull them out in the morning, and pop them in the toaster to thaw.

Oat Cakes
Makes about 15 pancakes
3/4 cup oat flour (you can make this by pulsing rolled oats into a food processor or spice grinder until finely ground; 1 cup of oats yielded 3/4 cup oat flour for me)
1 cup all-purpose flour
2 tablespoons sugar
2 teaspoon baking powder
3/4 teaspoon Kosher or coarse salt
3 tablespoons unsalted butter, melted and cooled slightly (plus extra for the pan)
1 1/4 cups whole milk
1 cup cooked oatmeal (I used old fashioned oats)
1 tablespoon unsulphured molasses
2 large eggs

Whisk the dry ingredients (oat flour, flour, sugar, baking powder and salt) together in a large bowl. In a smaller bowl, whisk the butter, milk, cooked oatmeal, molasses and eggs together until thoroughly combined. Gently fold the wet ingredients into the dry ingredients. Heat a frying pan to medium-low. Rub the pan generously with butter; Dollop 1/4-cup mounds of batter onto the pan, 2 or 3 at a time. Once bubbles have begun to form on the top side of the pancake, flip the pancake and cook until the bottom is brown. Remove pancakes from pan and continue with the rest of the batter.

Tuesday, June 26, 2012

Flag wreath

The fourth of July is one of my favorite holidays. It is a time to celebrate with friends, relax on the water or camp in the mountains.  The fireworks remind me of going to our country club laying on the fairways or watching Rhythm and Booms on Lake Mendota.  Unfortunately this year there will be a lack of fireworks in Colorado, but for good reason. So while trying to get myself in the mood to celebrate this year someone at work showed me this great wreath for my door.  It is very easy, but does take about 1 to 2 hours.

Supplies you will need:
- Straw wreath – keep in plastic wrapping
- Red, white and blue yarn (rolled into balls, much easier)
- White buttons or white felt sheet for Stars

Begin by wrapping red yarn around the wreath. It is difficult to keep them in a single row and to be honest by the end I was just wrapping as quickly as possible. I did not glue the yarn down, I found that the ends easily stayed with wrapping. Alternate red and white colors. Lastly use blue yarn wrapping a slightly larger area.

I couldn’t decided between using white buttons or the felt stars, so for now the stars will work. Apparently I am unable to cut stars without a template, but luckily I found that by using Google images I was able to find some good templates.

Happy 4th of July ( a little early!)

Saturday, June 16, 2012

S'More bars

Fathers day is tomorrow and although I may not be home to celebrate I want to thank my dad for everything.  My parents have always been a support system, a sounding board and a foundation to who I have become.  They have always trusted in me and encouraged me to follow my passions whether it be a masters degree or signing up for triathlons.

Father's day is a day that we celebrate and appreciate our father, but I also feel it represents the beginning of summer: water skiing, golfing and bike rides. While thinking about the beginning of summer and this weekend ahead I could not stop thinking about bonfires and of course s'mores.  Seeing as though we do not have a back yard or even much of a patio, s'mores are out of the question.  So I found this recipe and they are pretty close to amazing. I did make some substitutions to try and make them "low fat" seeing as I could eat the entire pan in one sitting.

Below is my adapted recipe and I have to warn you, it gets a little messy when layering... but they are delicious!

Ingredients:
1/4 cup butter (or 1/2 cup butter if you do not want to substitute with yogurt)
4 tablespoons plain chobani yogurt (non-fat)
1/4 cup brown sugar
1/2 cup sugar
1 egg
1 teaspoon pure Vanilla Extract
1 1/3 cup all purpose flour
3/4 cup graham crakers (about 4 large graham crackers - low fat)
1 teaspoon baking soda
pinch of Kosher salt
2-3 king sized chocolate bar (ie: Hershey's)
1 1/2 cup marshmallow fluff (I used the 7 oz marshmallow fluff jar)

 - Preheat oven to 350 degrees. Grease 8 or 9 inch square baking dish or place parchment paper with 2 inches of overhang on two of the sides. 

- Cream butter and sugars with paddle attachment on high. Slowly add chobani yogurt and beat for 4 minutes. Add egg, scrape down sides of bowl. Add Vanilla extract. 

- In a separate bowl whisk together flour, graham crackers baking soda and salt.  

 - With the mixer on low speed, slowly add flour mixture. Mix until just combined.

- Divide dough in half and press 1/2 dough in an even layer on the bottom layer of the dish. (It was a little difficult for me to spread so I used a little flour on my hands to help spread evenly in dish.)

- Place chocolate bars over dough mixture so it is completely covered. Next spread fluff over chocolate bars.

- Lastly form remaining pieces of dough into flat squares and place over fluff. It does not have to look perfect or completely cover all of the fluff.

- Bake for 30 to 35 minutes until top is browned. Let cool completely before removing bars. Makes approximately 16 bars.

Happy Fathers day dad!

Wednesday, June 13, 2012

Rhubarb Strawberry Crumble Bars

One of my favorite things about summer in Denver is Jazz in the Park. We are lucky enough to live two blocks away from one of the biggest parks and every Sunday starting in June, a jazz band plays from 6-8. Everyone brings picnic baskets, blankets, volleyball nets and bocce ball sets. It has become increasingly popular over the last couple of years and it is always great people watching.

Prior to this weeks' Jazz in the park I went to the farmers market and purchased some rhubarb, so that I could make some sort of bar that would be easy to bring to the concert and share with others. After searching I found an excellent recipe that was adapted from a recipe on Martha Stewart. It was delicious!

For the Bars:
3/4 cup butter - room temperature
1 1/4 cup powdered sugar
2 large eggs
3/4 teaspoon pure vanilla extract
1 cup Flour
3/4 teaspoon baking powder
1/2 teaspoon kosher salt

Fruit mixture:
1/2 lb rhubarb, cut into 1/2 inch pieces
1/2 lb strawberries, sliced 1/4 inch thick
1/3 cup flour
1 1/2 tablespoon brown sugar
1 tablespoon corn starch

Streusel:
1/2 cup butter, melted
3/4 cup packed brown sugar
1 1/4 cup flour
1 teaspoon Kosher salt

1. Preheat the oven at 350 degrees and line a 9 inch baking pan with parchment paper, leaving a 2 inch overhand on two of the sides.

2. In a large bowl, whisk together flour, baking powder and salt and set aside. In a separate bowl, mix fruit mixture and set aside.  Combine all ingredients for streusel mixture and set aside.

3. In a standing mixer with the paddle attachment on med-high, beat together butter and powdered sugar until light and fluffy. Add eggs one at a time, scraping down the sides in between.  Add vanilla extract. Reduce the speed to low and slowly add flour mixture until just combined.

5. Transfer batter to prepared pan. Next spread fruit mixture on top, lastly topping it off with the streusel mixture.

6. Bake for 50-55 minutes until the top is golden brown and a tooth pick comes out clean. Let cool and remove and cut in to small bars. Enjoy!

Tuesday, June 12, 2012

Strawberry Freezer Jam

Let me preface this post with the fact that I am not a jam connoisseur, but I truly believe that my Grandma makes the BEST Strawberry Jam.  Strawberries are in abundance right now, so I purchased 3 big containers from the Farmers' Market (thanks H!) and called my Grandma for the recipe.  My Grandma seemed a bit surprised that I didn't know the recipe as she began to recite it off the Sure-Jell box. What?! I was shocked that this wasn't some super secret, passed down through the ages recipe, but to be honest, it was kind of a relief that the process didn't seem too daunting.

The first thing you must know before you begin your jamming experience is that there are two types of jam; cooked jam and freezer jam. 

Cooked Jam - Fruit that has been cooked and processed, so it can be stored at room temperature for up to a year. This process is more labor intensive than Freezer Jam, but I have been told that it is worth the effort. When people talk about "preserving" & "canning", this is what they are talking about. 
  
Freezer Jam - Raw (uncooked) fruit.  Jam needs to be stored in the fridge (for up to 1 month) or freezer (up to 1 year) until it is eaten. Also note that freezer jam is not as firm as canned jam (which does make it easier to spread). 

My Grandma has made both types of jams, but the jam that I know and love just happens to be her Strawberry Freezer Jam, so this is what I decided to make.  I needed to grab a few things from the store before I began the process;

·     Canning jars (freezer safe of course!)
·     Pectin (Sure-Jell, Ball etc) I happened to use a no/low sugar needed pectin, so that I wouldn't have to as much sugar in my jam. I was very happy with the result
·     Ingredients – fruit, sugar etc. see recipe (make sure you follow the recipe for freezer jam) on your pectin box/container for a list of the ingredients needed.  
Like I stated above, I just used the recipe on the box, but here are some links to the related websites for Sure-Jell and Ball Real Fruit Pectin in case you want to take a look.

Have fun making this fabulous jam and just know, that in December, you’ll be happy to pull a little bit of summer out of your freezer


Monday, June 11, 2012

Blueberry Lemon Bundt Cake

This is the perfect summer dessert, as it showcases blueberries that are now in season and combines them with a tart and lemony zing! The cake itself is extremely moist and the greek yogurt gives it a rich and creamy texture.  The Blueberry Lemon Bundt Cake is great for entertaining, as its' presentation is flawless and more importantly, effortless with the use of a  bundt pan.

Recipe
2 1/2 cups all-purpose flour
2 tsp baking powder
1/2 tsp salt
1 cup unsalted butter, room temperature
1 cup granulated sugar
4 large eggs
1 tsp vanilla extract
1/2 cup sour cream
1/2 cup greek yogurt*
2 cups blueberries
2 Tbs grated lemon zest
  1. Preheat oven to 350 degrees. In a bowl, whisk 2 1/2 cups flour with baking powder and salt. In a separate bowl, mix sour cream and greek yogurt together. Set aside.
  2.  Cream butter and sugars on high speed until light and fluffy. Add eggs, one at a time, beating until incorporated. Beat in vanilla.  Reduce speed to low; add four mixture in three additions, alternating with two additions of sour cream/yogurt mixture.
  3. In a bowl, toss blueberries and lemon zest with a teaspoon of flour; gently fold into batter.  Coat a 12-cup nonstick bundt pan with cooking spray. Spread batter into prepared pan.
  4.  Bake cake on the bottom rack of the oven until a toothpick inserted into center of the cake comes out clean, 60-65 minutes.  Cool in pan for 20 minutes. Invert onto a rack; cook completely, top side up.
  5.  Dust with confectioners' sugar or cover with lemon glaze (add juice from lemons used for zest, to a few Tbs powdered sugar, until you reach your desired taste and thickness)
* I used a lemon flavored chobani greek yogurt which gave the cake even more lemon flavor. I was extremely happy with the result!!

Friday, June 8, 2012

Hooray for the CSA!

This year Dan and I decided to purchase a half share of a local CSA, Equinox Community Farm.  For those of you who are unfamiliar with CSAs (Community Supported Agriculture), they provide a relationship between local farmers and the community. The goal of CSA is to reconnect people with the land that sustains them. As a shareholder I know the farm where my food is coming from, their growing practices and I am able to form a relationship with our farmer. Our shares are delivered weekly for twenty weeks from June through October and they contain vegetables that we are familiar with as well as one or two "non-traditional" veggies. 
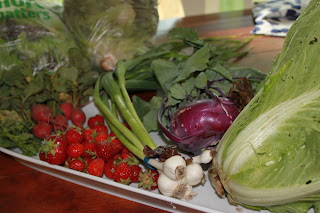
Yesterday was the start of our CSA season. Our box contained radishes, kohlrabi, green garlic, napa cabbage, red leaf lettuce, spinach, mixed greens and strawberries. I cannot believe that we received all of this in our half of a share.  I am so excited to use all of my freshly delivered produce. I would highly recommend that you check out a CSA in your area. You will  not be disappointed.

Tuesday, June 5, 2012

Sweet Mandy B's

Unfortunately my post isn't about anything I made, but it is about something that I love :) We spent a whirlwind weekend in Chicago and one of the requirements for the trip was to stop at our favorite bakery, Sweet Mandy B's. Something about this place is so comforting to me - not sure if it is the proximity to my old apartment (right below it), or the smell as you walk past (think heaven), or the glass cases full of old fashioned desserts, but I love going there. The treats at Mandy B's aren't fancy or fussy, but they sure do taste good.
I took Frances there for the first time (that she can remember) and even though she is 99% like her dad, she may have inherited my obsession with baked goods.  She was extremely overwhelmed with the task of having to select just one item to try...So needless to say, we left with a grocery bag full. We made it back to Madison with 4 cupcakes, the rest we polished off during our weekend o' fun. So, next time you are in Chicago, you should definitely stop in. You will not be disappointed.

Yellow Cake Cupcakes with Vanilla Butter Cream Frosting
      My Favorites
  • slice of chocolate cake
  • vanilla cupcakes with butter cream frosting
  • peanut butter rice crispy with chocolate top
  • sugar cookie with butter cream frosting
  • snickerdoodle
  • chocolate gingerbread cookie
  • rice pudding

Monday, June 4, 2012

Baby shower gift - Burp cloths

I have a friend's baby shower coming up and I decided to make personalized burp cloths. My sister Jenny has made these for her babies and they are her favorite beause they are really soft and super absorbant.   I am a beginner sewer so I thought this would be another basic project that can help me improve my sewing skills. I read various blogs and books for ideas on the best way to make these and the one that I found very helpful was MADE, which you should reference if you have questions after my tutorial below.


You need two types of fabric, a soft absorbant fabric and a fabric that you select with a fun pattern/color.   I used chenille for the soft fabric (you can also use terry cloth) and then adorable monkey and owl prints on a soft cotton. Make sure to wash fabric prior to starting. You can purchase a contrasting thread color to highlight the stitching, but I decided to stay with a white thread since my lines aren't exactly straight yet :)

Instructions:
1. Cut both fabrics into 10 inch x 18 inch squares and Iron fabric. Place the two fabrics right-sides facing one another and pin along the edges.

2. Sew along the edges leaving a 3 inch opening on one of the sides. Trim the corners off and turn cloth right side out.  Pin opening shut.


3. Sew about 1/4 inch from the edge along the boarder of the cloth. Use lint roller on fabric prior to gifting!