Thursday, December 26, 2013

healthy oat & date muffins

Last night I made Giada's panettone bread pudding (i will  make again and post - it was amazing), but today I decided to go with a healthy muffin recipe, that I found in Women's Health.  I made a few alterations and I am super happy with the result.  The muffins have a natural sweetness, vs. the desserty sweets I have been eating so much of lately. This is the perfect treat to grab on your way out the door in the morning.  They are filling, low fat, full of fiber and the flax even adds protein!


Ingredients
1 1/2 cup oatmeal
3/4 cup milk
3/4 cup whole-wheat flour
2 Tbs ground flax seeds
2 tsp baking powder
1/2 tsp baking soda
2 tsp cinnamon
15 dates finely chopped (about 1 cup)
1 egg beaten
4 Tbs coconut oil
2 Tbs honey
1/2 cup applesauce

Preheat oven to 400 degrees.  Combine oatmeal and milk in a bowl and let soak.  In a separate large bowl, mix flour, flax seed, baking powder, baking soda, cinnamon and dates.

In another bowl, combine egg, oil, honey, and applesauce.  Add to oatmeal mixture, then stir in flour mix.

Spoon batter into a muffin tin sprayed with non-stick spray. Bake for 15 minutes or until tops spring back when lightly touched.  Cool on a wire wrack.


Sunday, December 22, 2013

Glittered Stag Decor

Looking for some last minute holiday decor? I am obsessed with the stag head trend, so when looking for some Christmas ideas I couldn't pass this easy project! We had a Christmas party a couple of weeks back and when pulling out all of my decorations, I realized I was neglecting the basement and needed some simple and quick.

What you need:
Canvas
Stock Paper paper
Swivel exacto knife (my new favorite tool)
Glitter Glue
Glitter


Start by finding a template online, like this and print. Cut it out and then trace it on to a heaver paper, ie stock paper. Cut out your stencil. Trace the stencil on to canvas. With you glue fill in Stag head. Pour glitter on top tapping excess glitter off. To seal the glitter, spray with hair spray.


Friday, December 20, 2013

Chocolate Nutella and Sea Salt Fudge

Rewind to a month ago, I would spend the girls' nap time working out, cleaning, sewing, stalking people on Facebook, you know the usual stuff. For the past week, my "nap times" have solely consisted of baking, baking some more and then "testing" all of the baked goods.  Yesterday I made peanut butter blossoms (an oldie but a goodie) and I took a stab at making a new treat, Chocolate Nutella & Sea Salt Fudge.
Yes, it does taste as amazing as you would imagine.  

I definitely licked the spoon, and bowl clean.

Chocolate Nutella & Sea Salt Fudge
1 Tbs butter for greasing the pan
1 can (14oz) sweetened condensed milk
1 tsp vanilla extract
8 oz high quality bittersweet 60% chocolate chips
1 cup Nutella, room temperature
3 Tbs unsalted butter, room temperature, cut into 1/2 inch pieces
1/2 tsp sea salt

Grease the bottom and sides of a 8x8 inch baking pan.  Line the pan with parchment paper, leaving a 2-inch overlap on the sides.

In a medium glass bowl, stir together sweetened condensed milk, vanilla, chocolate chips, Nutella and butter. Form a double boiler by setting the bowl over a medium pot of gently simmering water. The water level should be low enough that the bottom of the bowl does not touch the water.  Stir until the chocolate chips are melted and the mixture is smooth, 5 to 7 minutes.
Scrape the mixture into the prepared pan, spread the top smooth with a spatula and sprinkle with sea salt. Refrigerate until the fudge is firm, at least 2 hours.

Once the fudge is chilled, run a knife under hot water, dry it off, and run it around the edges of the pan to loosen the fudge.  Using the overhanging parchment paper, lift the fudge out. Peel off the parchment paper. Cut the fudge into 3/4 inch squares.  Store in the refrigerator in an airtight container or wrapped well in plastic wrap and foil.

Wednesday, December 18, 2013

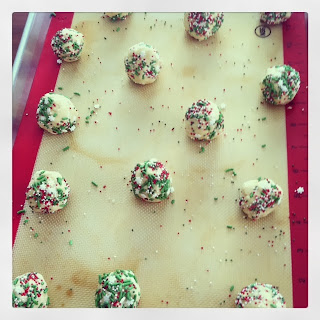
Candy Cane Kiss Cookies


I made this cookie for the first time yesterday and it is already a favorite with my girls. They are bite-sized, colorful and buttery with a peppermint kiss. What more could you ask for in a Christmas cookie?! 
This easy (and very quick) recipe is from Sally's Baking Addiction. Her blog has some amazing looking cookies on it right now!

Ingredients
10 Tbs unsalted butter, softened to room temp
1 cup granulated sugar
2 egg yolks (room temperature)
1 tsp vanilla extract
1 and 1/2 cups unbleached all-purpose flour
3/4 tsp baking powder
1/4 tsp salt
sprinkles
24 Candy Cane Hershey Kisses

Directions:

Preheat oven to 350F degrees. Line two large baking sheets with parchment paper or silicone baking mats. Set aside. Using a hand-held or stand mixer with a paddle attachment, cream the butter and sugar together on medium speed for 5 full minutes, scraping down the sides and the bottom as necessary. Add the egg yolks and vanilla, beating on medium-high until fully combined. Scrape down the sides and bottom of the bowl as necessary. In a medium bowl, toss the flour, baking powder, and salt together. Add the flour mixture to the wet ingredients on low speed until fully combined. The dough will be very thick. If the dough is extremely sticky, chill for at least 45 minutes.

Roll dough into balls, a little less than 1 Tablespoon of dough each. The dough may seem dry, but the warmth of your hands will allow it to come together in a ball. Roll into assorted sprinkles and bake for 8-10 minutes. The cookies will look very, very under baked. That's what you need. Do not over bake. Allow the cookies to cool on the baking sheet for about 5 minutes. Press a Hershey Kiss into the center and immediately put the cookie sheet into the freezer for 5 minutes. Doing this will prevent the kiss from melting. Cookies remain fresh tightly covered at room temperature for 1 week.


Monday, December 16, 2013

White-Chocolate Cherry Shortbread

Going to bed last night, I vowed not to eat sweets during the upcoming week. Now I find myself trying to determine what goes into the category of "sweet".   Do snacks like chocolate covered raisins, frozen yogurt, hot chocolate and granola count as a sweet?  Not in my book.  
Some people might say that it gets trickier when trying to decide if items such as gingerbread and shortbread are sweets, but once again, I have decided NO, they are not.  I wouldn't count whole wheat bread or 9 grain or even white bread as a sweet, so why would shortbread or gingerbread be a sweet?! 

With this rationale, I had zero guilt when I made (and ate) these delicious White-Chocolate Cherry Shortbread cookies today. 


White-Chocolate Cherry Shortbread
(recipe - Better Homes & Gardens)
Ingredients
1/2 cup of maraschino cherries, drained and finely chopped
2 1/2 cups of all-purpose flour
1/2 cup of sugar
1 cup of cold butter
12 ounces of white chocolate baking squares with cocoa butter, finely chopped
1/2 teaspoon of almond extract
2 drops red food coloring (optional)
2 teaspoons of shortening
White nonpareils and/or red edible glitter (optional)

Directions
Preheat oven to 325 degrees F. Spread cherries on paper towels to drain well.
In a large bowl, combine flour and sugar. Using a pastry blender, cut in the butter until mixture resembles fine crumbs. Stir in drained cherries and 4 ounces (2/3 cup) of the chopped chocolate. Stir in almond extract and, if desired, food coloring. Knead mixture until it forms a smooth ball.
Shape dough into 3/4-inch balls. Place balls 2 inches apart on an ungreased cookie sheet. Using the bottom of a drinking glass dipped in sugar, flatten balls to 1-1/2-inch rounds.
Bake in preheated oven for 10 to 12 minutes or until centers are set. Cool for 1 minute on cookie sheet. Transfer cookies to a wire rack and let cool.
In a small saucepan, combine remaining 8 ounces white chocolate and the shortening. Cook and stir over low heat until melted. Dip half of each cookie into chocolate, allowing excess to drip off. If desired, roll dipped edge in nonpareils and/or edible glitter. Place cookies on waxed paper until chocolate is set.


Thursday, December 12, 2013

Gingerbread - Chocolate Chip Muffins

I am struggling with the fact that Christmas is less than 2 weeks away.  The late Thanksgiving has really caught me off guard, so instead of coming to you with tidings of comfort and joy I bring tidings of panic and stress. My Christmas cards arrived today (LATE) and the machine that cut them, chopped off a big chunk of the wording.  AHHHHH.  I called the company and they told me that they should have them done by late next week - the 21st??  WHAT?!  I have been so busy doing random, but very important holiday related things, sewing, baking, gifting, (oh and taking care of my kids) that Dan had zero pairs of clean underwear to take on a business trip...oops. So, In an effort to remain sane and to ensure that I enjoy Christmas, I have decided 3 things. 

1. I need a boot to drink my morning coffee out of, so I have enough energy to get through my day
2. Dan might have to start doing his own laundry
3. I need to slow down, and remember what this season is really about.....eating. 

Try these. They are awesome (and very fast to make)

GINGERBREAD & DARK CHOCOLATE  MUFFINS

3 cups all purpose flour (or white-whole wheat flour)
1/4 teaspoon salt
1 and 1/2 teaspoons baking soda
1 and 1/2 teaspoons ground ginger
2 teaspoons ground cinnamon
1/2 teaspoon ground cloves
3/4 cup dark molasses
1/2 cup butter
1/2 cup dark brown sugar
1 large egg
3/4 cup plain or vanilla yogurt
1/4 cup  milk
1 cup dark chocolate chips


Directions:

Preheat oven to 350F. Spray 12 cup muffin tin with non-stick spray or line with muffin liners.

In a large bowl, mix together flour, salt, baking soda, ginger, cinnamon and cloves. Set aside.

In a microwave-safe bowl, heat the molasses and butter on high for about 1 minute in the microwave. Stir until thoroughly mixed together. Set aside. In a second bowl, whisk together the brown sugar, egg, yogurt, and milk. Pour into the butter. molasses mixture and whisk until everything is incorporated. Pour wet ingredients into dry and mix until  combined. Do not overmix. Batter will be very thick and lumpy.

Fill your muffin tins to the very top and bake for 20 minutes at 350F.  Muffins are finished when a toothpick inserted into the center comes out clean.


Don't forget to make my favorite eggnog and cranberry muffins this holiday season (recipe here).  AND, if you love the combo of ginger and chocolate try these and these!

Wednesday, December 4, 2013

Cranberry Cookie Bars


Bring on the Cookies!!!
This recipe from the smitten kitchen cookbook  is super easy and the resulting bars taste more like a pie than a cookie. What could be better than a pie-cookie? NOTHING!
These pie-cookies are easy to cut, stack and wrap up for a hostess gift (like I did!!) and they look very festive - don't you think?!

Cranberry Crumb Bars with Mulling Spices (from the Smitten Kitchen Cookbook by Deb Perelman)
Recipe for the crumb:
16 tablespoons unsalted butter, chilled, plus more at room temperature for the pan
3 cups all-purpose flour
1 cup granulated sugar
1/2 teaspoon table salt
1 teaspoon baking powder
1/2 teaspoon ground cinnamon
1/4 teaspoon ground nutmeg
1/8 teaspoon ground cloves
1/8 teaspoon ground allspice
1 large egg

Recipe for the filling:
1/2 teaspoon freshly grated orange zest
1 1/2 tablespoons orange juice
3 cups fresh cranberries
1/2 cup sugar
1 tablespoon cornstarch

Preheat your oven to 375°F. Line the bottom of a 9×13-inch baking pan with parchment paper, and butter the sides and the parchment. In a large, widish bowl, whisk together the flour, sugar, salt, baking powder, and spices. With a pastry blender or fork, work the chilled butter and the egg into the flour mixture until the mixture resembles coarse meal. Pat half the crumb base into the bottom of your prepared pan; it will be thin.

In the bowl of a food processor or blender, briefly pulse the filling ingredients until the berries are coarsely chopped but not pureed. Spread the filling over the crumb base. Sprinkle the remaining crumbs evenly over the cranberry mixture.

Bake cookies for 30 to 35 minutes, or until lightly browned on top. Cool completely before cutting into squares.

Healthier Broccoli and Cheese Soup


Ug, I feel like a stuffed sausage. Seriously, someone help me. There are waaaay too many temptations this time of year and with the threat of bathing suit season at least 6 months away, my will-power is slim to none.
I do like eating healthy, but I do not like to sacrifice taste (or cocktail weenies). I decided to try this cooking light recipe, in the hopes that it would be satisfying, delicious and healthy, and..... my entire family loved it (obviously I cooled it down for the tots)!


Broccoli & Cheese Soup
Recipe - Cooking Light

Ingredients Cooking spray
1 cup chopped onion
2 garlic cloves, minced
3 cups fat-free, low-sodium chicken broth
1 (16-ounce) package broccoli florets
2 1/2 cups 2% reduced-fat milk
1/3 cup all-purpose flour
1/4 teaspoon black pepper
8 oz of Velveeta Light, cubed
3 oz sharp shredded cheddar


Preparation 
Heat a large nonstick saucepan coated with cooking spray over medium-high heat. Add onion and garlic; saute 3 minutes or until tender. Add broth and broccoli. Bring broccoli mixture to a boil over medium-high heat. Reduce heat to medium; cook 10 minutes.
Combine milk and flour, stirring with a whisk until well blended. Add milk mixture to broccoli mixture. Cook 5 minutes or until slightly thick, stirring constantly. Stir in pepper. Remove from heat; add cheese, stirring until cheese melts.
Place one-third of the soup in a blender or food processor (I used an immersion blender), and process until smooth. Return pureed soup mixture to pan.

Saturday, November 30, 2013

Bison Chili

Winter is here in Denver (at least for the past week) and the snow has actually stayed on the ground!  We woke up at the crack of dawn on Saturday to head up to the slopes for the first time, and surprisingly enough. there was very little traffic and the sky was crystal clear.   The snow covered trees and simply wearing my down jacket got me in the mood for not only for the upcoming holidays, but football and chili. I have fallen in love with this outstanding recipe (and book) from the True Food cookbook. The flavor is smoky and spicy, the perfect chili combination. Bison is an excellent source protein and iron and is actually leaner and with less cholesterol than beef. So eat up!


Ingredients:

6 Tablespoons Olive Oil
24 ounces ground Bison
salt and ground black pepper
1 large onion
1-2 jalapeno peppers, seeded and diced
4 garlic cloves
2 tablespoons ground cumin
2 tablespoons chili powder
2 tablespoons pure ancho chile powder
1 teaspoon red pepper flakes
2 cups canned diced tomatoes (San Marzano)
2 cans (15oz) white beans, rinsed and drained
1 cup Chicken Stock
2 (1-inch square) piece of dark chocolate
2 teaspoon dried oregano
1 teaspoon paprika
1/4 teaspoon cinnamon
2 teaspoon salt
1/2 chopped fresh oregano

** garnishings: greek yogurt, manchego or cheddar cheese, fresh cilantro, corn bread, whole wheat tortillas

In a large pot, heat the olive oil over medium high heat. Add the Bison, season with salt and pepper and stirring occasionally until the mean is browned.  Add onions and saute for two minutes. Add jalapenos and garlic, sauteing for another 2 minutes. Add cumin, chili powder, ancho chile powder, red pepper flakes, and mix well with bison.

Add the diced tomatoes, beans and chicken stock, bringing the mixture to a simmer. Reduce the heat to low. Let simmer for 30 minutes, stirring often.

Add the chocolate, oregano, paprika cinnamon and salt. Stir and let simmer for another 15 minutes. Ladle into bowls and serve with desired garnishes. If not serving immediately let the chili cool or freeze.


Wednesday, November 27, 2013

Spiced Nuts

Nuts.....almost everyone loves them and they are sooo much better for you than the other holiday junk that I stuff my face with.  Emeril's candied, spicy nuts are amazing. I have made two batches in the last week - I throw them on salads, add them to trail mix and eat them by the handful (NOTE - if you eat nuts by the handful, they are no longer a super healthy snack).  They pack a bit of heat, so if you like spicy, give these a try for your next holiday gathering.

Recipe for Spiced Nuts - Emeril Lagasse

Ingredients
1/2 teaspoon ground cumin
1/2 teaspoon cayenne pepper
1/2 teaspoon ground cinnamon
4 cups unsalted mixed nuts, such as walnuts, pecans, hazelnuts, and almonds
4 tablespoons unsalted butter
6 tablespoons brown sugar
1 teaspoon salt
Mix spices and reserve.

Directions
Heat the nuts in a dry skillet and cook, stirring frequently, until they begin to toast, about 4 minutes. Add the butter and cook, stirring, until the nuts begin to darken, about 1 minute. Add the spices, the sugar, 1 tablespoon water, and the salt and cook, stirring, until the sauce thickens and the nuts are glazed, about 5 minutes.

Remove the nuts from the heat and transfer to a baking sheet lined with aluminum foil, separating them with a fork. Let the nuts stand until cooled and the sugar has hardened, about 10 minutes. Store in an airtight container.

Saturday, November 23, 2013

cinnamon infused simple syrup for the brandy old fashioned


Winter in Wisco....What does it mean to you? Apparently to the citizens of this fine state, it means enjoying one of the tastiest cocktails known to man, the brandy old fashioned.

Wisconsin has the highest percentage of retail spending on brandy in the United States.

In 2012, California-based Korbel shipped about 324,000 nine-liter cases of brandy. Of those, about 141,000 - 43.5% of Korbel's production - went to Wisconsin.

These stats made me feel better about the fact that we are already on our second bottle of Korbel this month (FYI - We did have some people over - dan and I cannot take all of the credit),

An Old Fashioned is easy to make and you probably already have all of the ingredients that you need at home. There are many ways to enjoy this classic drink, but I like to use simple syrup vs. plain sugar when I mix mine. The syrup is super easy to make and it makes your house smell amazing in the process. I have been giving jars of it away as hostess gifts and party favors, and they have been well received :)

simple syrup (good on ice cream too!!)

Simple Syrup

4 cups sugar
4 cups water
8 cinnamon sticks


Add sugar, water and cinnamon to a medium saucepan. Bring mixture to a boil and reduce heat to low. Let the mixture simmer for 2 hours. Remove from heat and store in the refrigerator in a jar or airtight container. 


Brandy Old-Fashioned 

2 shots brandy
2 dashes Angostura bitters
1 Tbs of simple syrup
top with lemon lime soda (I use diet 7up)
garnish with a cinnamon stick and fruit (cherries, oranges etc)


CHEERS!!!


Tuesday, November 19, 2013

Macaroni and Cheese with Butternut Squash


This recipe has been one of my favorites for years.   It is the perfect fall dish and it is comfort food that I do not feel too guilty about. The butternut squash is a creamy & flavorful addition to the classic recipe and I usually add a little extra cheese :).

I am not sure if it will happen to you, but for some reason this mac & cheese tends to "disappear" when I am at work all day.  I am pretty sure Tom does not know how to open the fridge (although it wouldn't surprise me!). Needless to say, you will go back for more and more until it is gone.

Ingredients:
1 medium butternut squash, peeled and cut into one inch cubes
1 cup low-sodium chicken stock
1 1/2 cups nonfat or low fat milk
Pinch of graded nutmeg
Pinch of cayenne pepper
3/4 teaspoon coarse salt
Freshly ground black pepper
1 lb elbow macaroni
4 ounces extra-sharp cheddar cheese, grated
4 ounces gouda cheese, grated
4 tablespoons Parmesan cheese, finely grated
2 tablespoons fine breadcrumbs
1 teaspoon olive oil
1/2 cup part-skim ricotta cheese


1. Preheat oven to 375 degrees.  Spray a 9 inch square baking dish and set aside. In a medium sauce pain, combine squash, milk and stock. Bring to a boil over medium-high heat. Reduce heat and simmer until squash is tender, about 20 minutes. Remove from heat. With an emerson blender or a wooden spoon, mash squash until only small pieces are left. Add nutmeg, cayenne pepper, salt and season with black pepper. 

2. Meanwhile in a large pot, bring water to a boil and cook pasta as directed. Drain and transfer to a large bowl; add squash mixture. Mix in ricotta, cheddar, gouda and two tablespoons of parmesan. 

3. Transfer noodle dish to your prepared pan. In a small bowl mix breadcrumbs, remaining parmesan and olive oil. Sprinkle mixture on top of dish. Cover with foil and bake for  20 minutes. Remove foil and bake for another 30-40 minutes, until the cheese is browned. Enjoy immediately. 


Tom, my kitchen floor cleaner/baking buddy

Tom LOVING fall! (and his long locks)

Friday, November 15, 2013

Deep Dish Apple Pie

This is the time of year that I usually start to "hunker down".  I become less social, I start wearing my very mom-ish wool clogs, and I spend 75% of my day in the kitchen, baking, eating and sipping (or gulping) old fashioneds. This holiday season is going to be different - well, sort of.  I will probably still do all of the above, but instead of resigning myself to a winter of isolation,  I am going to say "yes" to more invitations and try to have people over, even if it is just to drink coffee and whine about how cold it is.

This pie is perfect for any social gathering, a 10am coffee or with a night cap.  The deep dish crust allows you to pack almost double the amount of apples that you would put in a traditional pie.  It looks beautiful and it tastes amazing.

* I used 3lbs golden delicious and 2 lbs of jonagold apples

deep dish apple pie - recipe from the smitten kitchen cookbook


crust ingredients:
8 tablespoons (1 stick) salted butter, cold
1 1/4 cups all-purpose flour
1 teaspoon granulated sugar
1/4 cup ice water

filling ingredients:
5 lbs. apples (about 10-12 large apples)
1 tablespoon freshly squeezed lemon juice
1 cup granulated sugar
1/4 cup all-purpose flour
1/2 teaspoon salt
1/2 teaspoon ground cinnamon
1/4 teaspoon ground ginger
1/4 teaspoon ground cloves
1/4 teaspoon ground allspice
1/4 teaspoon freshly grated nutmeg


streusel ingredients:
3/4 cup granulated sugar
1 1/3 cups all-purpose flour
1 teaspoon baking powder
1/4 teaspoon salt
1/2 teaspoon ground cinnamon
8 tablespoons salted butter, melted

directions:
to make the crust: cut the cold butter into one-inch cubes. in a food processor, pulse the flour, sugar, and butter cubes together until the butter is incorporated into the flour. while running the food processor, slowly pour the cold water into the mixture. as soon as the mixture forms into a dough ball, stop the food processor. remove the dough from the food processor and form it into a ball. wrap the dough ball in plastic wrap and let the dough ball chill in the refrigerator for one hour. after one hour, roll out the dough out on a floured surface to fit a 9-inch springform pan with 3-inch sides. place the dough into the pan, pressing it against the sides and along the bottom of the pan. trim off any overhanging dough. let the dough chill in the refrigerator while you prepare the filling.

to make the filling: peel, core, and dice the apples into cubes, no more than 1/4 inch thick. (the small pieces will fit better edge to edge in the crust.) put the diced apples into a large bowl. sprinkle the lemon juice, sugar, flour, salt, and spices over the apples and toss well making sure that all of the apples are evenly coated. evenly distribute the apple mixture, along with it's juices, in the prepared pie crust. use a spatula to spread the apples as flat and evenly as possible in order to make sure that all of the apples fit into the crust. bake the pie for 30 minutes at 375 degrees F while you prepare the streusel.

to make the streusel: stir together the sugars, flour, baking powder, and spices in a bowl. pour in the melted butter and stir until large clumps form. set the streusel aside until ready to use.

after the pie has baked for 30 minutes at 375 degrees F, remove the pie from the oven. sprinkle the streusel over the top of the pie, pressing it into the apples. reduce the oven temperature to 325 degrees F and bake the pie for another 60 minutes. once baked, allow the pie to sit at room temperature to cool completely. (the pie will slice cleanly after sitting in the refrigerator for a while*.) remove the outside of the springform ring and slide the pie out to slice and serve.

* I baked my pie the night before put it in the refrigerator and pulled it out the next morning.  I served it at room temp and it looked and tasted great!


Don't you love my vintage pie tin that I scored at St. Vincents?!

Saturday, November 9, 2013

Butternut Squash & Pesto Pizza

I have been trying to get a little more creative with ingredients on our Friday-Pizza nights.  I saw this recipe and decided to give it a try.  Everyone was a little skeptical at first, but it turned out delicious and we have made it several times since. The butternut squash is rich and savory, a perfect combination with the pesto and tomatoes.


Ingredients:
1/4-1/2 butternut squash, sliced thinly (1/4inch thick)
2 tablespoons sugar
1/2 teaspoon olive oil
Pesto
Cherry tomatoes, halved 
1/2 teaspoon oregano
1/2 red pepper flakes
Gouda or Fontina Cheese
Parmesan
Preheat oven to 400 degrees. Toss sliced butternut squash with olive oil and sugar. Place on a baking sheet and roast for 20 minutes or until tender.

Increase oven temperature to 450. On prepared pizza crust spread pesto. Top with butternut squash, tomatoes and shredded Gouda cheese. Lastly sprinkle with oregano and Parmesan. Bake for 20 minutes or until golden brown.


Friday, November 1, 2013

pumpkin snickerdoodle bars

Halloween may be over, but I cannot stop baking with pumpkin.  This recipe is from one of my good friends' blog, cookie confessions, and it has become a fall staple for our family.  Cinnamon and sugar deliciousness with pumpkin - how can you go wrong?!


Ingredients

Snickerdoodle layer
1 cup butter room temperature
2 cups brown sugar
2 eggs
1 tbsp vanilla extract
3 cups flour
2 tsp baking powder
1 tsp salt

Pumpkin layer
1 cup sugar
1/2 cup butter
2 eggs
1 cup flour
1 tsp baking powder
1 tsp salt
1 tsp pumpkin pie spice
1 1/2 cups canned pumpkin

Preheat oven to 350 degrees. Spray a 9x13inch pan.

Snickerdoodle layer:

In a standing mixer with the paddle attachment, beat the butter and brown sugar. Add one egg at a time until fully incorporated in the mixture, scraping down the sides of the bowl in between. Add vanilla. Fold in remaining three ingredients. Spread into prepared pan.

Pumpkin layer:
In a standing mixer with the paddle attachment, beat the butter and sugar. Again, add eggs one at a time as above.  In a separate bowl mix flour, baking powder, salt and pumpkin pie spice. Fold butter mixture and canned pumpkin to flour mixture until well combined. Spread over snickerdoodle mixture until smooth. Sprinkle with cinnamon sugar.

Bake for 40-45 minutes, until a tooth pick comes out clean. Let cool completely, enjoy!


Thursday, October 24, 2013

Pumpkin Protein Shake

The past month has been an absolute whirl wind.  I need to thank EVERYONE who helped Chris and myself with all of the wedding planning, creative ideas, keeping me sane, and for making the trip to Wisconsin to help us celebrate. We had such an amazing time! We were in Wisconsin a week before our wedding and then we honeymooned in Hawaii for almost two weeks and when we finally returned home to Denver, it was FALL! I absolutely love it. The beautiful trees and crisp weather is making my return to reality a little more tolerable.

I was maybe a little too relaxed on our honeymoon, so now, I am trying to eat smarter and I was looking for a healthy post- workout protein shake recipe that didn't involve spinach. I had "pinned" this awhile ago thinking it would come in handy and I love it.  Not only does it involve our obvious favorite, pumpkin, but it was honestly so good that I wanted more (and I normally don't say that about protein shakes.) All you have to do is blend and enjoy, such a great way to start the day!!


Ingredients:

1 cup skim milk (or almond milk)
1/2 - 1 frozen banana
1/2 cup pureed pumpkin
1 tsp cinnamon
1/2 tsp pumpkin spice
1 pinch ginger
1 scoop vanilla protein powder **


** I have protein powders that I am partial to.  Being a woman, I try to find protein powders that are meant to build lean muscle: high in protein, low in carbohydrates and lower calories.

Isagenix - the IsaLean Shake (recommended by my trainer) which I really like. It tastes great mixed with water in shakes like the one listed above.   I also use whatever Chris has around the house. Currently he has Syntha-6, which again is high in protein, low in calories and in carbohydrates.


Wednesday, October 23, 2013

whole grain pumpkin-banana bread

Yep, another pumpkin recipe.  I can't stop and I feel like my skin might have an orange tint to it.  This bread turned out moist and the pumpkin & banana combo has the perfect amount of sweetness.  My girls loved it and  the fact that I used whole wheat flour made me feel good about letting them have it for their afternoon treat.  

Whole Grain Pumpkin-Banana Bread 
(Adapted from King Arthur Flour)

1/2 cup (8 tablespoons) soft butter
2/3 cup brown sugar
3 tablespoons honey
2 large eggs
1 cup puréed pumpkin
2 mashed bananas, the riper the better
2 tablespoons orange juice or water
1 teaspoon vanilla extract
1 1/2 cups King Arthur White Whole Wheat Flour or Premium Whole Wheat Flour
1/4 teaspoon baking powder
1 teaspoon baking soda
3/4 teaspoon salt
1 teaspoon ground cinnamon
1 1/2 teaspoons pumpkin pie spice
1/2 cup dried cranberries
1/2 cup chopped  nuts (optional)

Directions
Preheat the oven to 350°F. Lightly grease an 8 1/2" x 4 1/2" loaf pan
In a large bowl, beat together the butter, sugar, honey, eggs, pumpkin, banana, orange juice or water. and vanilla.  Add the flour, baking powder, baking soda, salt, and cinnamon and pumpkin spice, stirring to combine.  Mix in the dried cranberries and nuts, if you're using them.
Spoon the batter into the prepared pan. Allow the batter to rest for 15 minutes, uncovered.  Bake the bread for 55 to 70 minutes, or until a cake tester or toothpick inserted in the center of the loaf comes out clean; and that same tester inserted about 1/2" into the top of the loaf doesn't encounter any totally unbaked batter.
Remove the bread from the oven, and cool it on a rack. When it's completely cool, wrap it well in plastic wrap, and store it overnight before serving.


Tuesday, October 22, 2013

Pumpkin Chocolate Chip Cookies


Every fall is the same.  We start spending more time indoors and I begin to notice all of the mini house projects that we have been putting off during the fun summer months... My closets should be cleaned out, the basement needs to be organized, our baseboards need a good scrubbing/painting, and let's not even get into the ridiculous leaf situation going on in our backyard.  Despite my mountain of a "to-do" list, all I want to do (during the girls' nap time)  is drink tea and bake, which is exactly what I have been doing.

Still on my pumpkin kick, I made these cookies from Sally's Baking Addiction and they were delicious. I am a sucker for the pumpkin/chocolate combo, and if you haven't tried it, this is the perfect way to jump start your addiction. 

Notes: I doubled the amount of chocolate chips and I used 1 1/2 tsp of pumpkin pie spice instead of nutmeg, cloves and allspice. 

Pumpkin Chocolate Chip Cookies  - Sally's Baking Addiction

Ingredients:
makes 12-16 cookies

1/2 cup (1 stick) unsalted butter
1/4 cup light brown sugar
1/2 cup granulated sugar
1 teaspoon vanilla extract
6 Tablespoons pumpkin puree
1 and 1/2 cups all-purpose flour
1/4 teaspoon salt
1/4 teaspoon baking powder
1/4 teaspoon baking soda
1 and 1/2 teaspoons ground cinnamon
1/4 teaspoon ground nutmeg
1/4 teaspoon ground cloves
1/4 teaspoon allspice
1/2 cup semi-sweet chocolate chips

Directions:
In a medium bowl, whisk the melted butter, brown sugar, and granulated sugar together until no brown sugar lumps remain. Whisk in the vanilla and pumpkin until smooth. Set aside.

In a large bowl, toss together the flour, salt, baking powder, baking soda, cinnamon, nutmeg, and cloves. Pour the wet ingredients into the dry ingredients and mix together with a large spoon or rubber spatula. The dough will be very soft. Fold in 1/2 cup semi-sweet chocolate chips. They may not stick to the dough because of the melted butter, but do your best to have them evenly dispersed among the dough. Cover the dough and chill for 30 minutes, or up to 3 days. Chilling is mandatory.

Take the dough out of the refrigerator. Preheat the oven to 350F degrees. Line two large baking sheets with parchment paper or silicone baking mats.

Roll the dough into balls, about 2 Tablespoons of dough each. Slightly flatten the dough balls because the cookies will only slightly spread in the oven. Bake the cookies for 8-10 minutes. The cookies will look very soft and underbaked. Keeping them in the oven for longer may dry them out. Remove from the oven and press a few more chocolate chips onto the tops, if desired. If you find that your cookies didn't spread much at all, flatten them out when you take them out of the oven.

Allow the cookies to cool for at least 10 minutes on the cookie sheets before transferring to a wire rack. The longer the cookies cool, the chewier they will be. I let them sit out for at least 1 hour before enjoying. I find that their chewiness and pumpkin flavor is more prominent on day 2. Cookies stay soft, moist, and chewy stored at room temperature for up to 1 week.

Freezing directions: Roll the chilled dough into balls and freeze in a large ziplock bag for up to 2 months. Baked cookies may also be frozen up to 2 months.


Monday, October 14, 2013

Caramel Apple Rice Krispies

Some how my girls are sleeping though 5 guys tearing
our roof off (obviously my girls are amazing).  These guys are sawing, pounding, stomping and blasting loud music.  

I can barely think straight with all of the noise, so instead of thinking I am eating.  I made these super easy caramel apple krispies and they taste deliciously like fall.  I had all intentions of sharing them with the roofers, but the supply is getting dangerously low.  If the girls continue to sleep, I'll make a second batch for them.  

Ingredients:
6 tablespoons unsalted butter
10 oz. bag of marshmallows
1 1/2 cups caramel apple cake mix (I used pillsbury's seasonal mix)
1/2 teaspoon vanilla extract
6 cups Rice Krispies
15 soft caramels unwrapped and roughly chopped

Directions:
Grease a 9" x 13" baking pan with butter or non stick cooking spray and set aside.
In a microwaveable safe bowl, melt butter and marshmallows, stirring occasionally.
Once marshmallows are melted and mixture is creamy, stir in cake mix and vanilla. Gradually stir in Rice Krispies until combined. Add caramels and stir. Pour mixture in prepared pan. Set aside until cool and cut into squares.

Thursday, October 10, 2013

Pumpkin Place Cards


Congrats Mrs. Lucas!!

Bridget was a stunning bride last weekend and the wedding went off without a hitch.
The new bride will have to post about her gold painted vases, table numbers and all of the other DIY wedding projects, but I wanted to show off these cute place cards so you could try making them for your fall family gatherings.


What you will need:
mini pumpkins
hot glue gun & glue
pins
paper


Write or print guest names on whatever you are using for the place cards.  Bridget purchased these from paper source and then using double sided tape, affixed a different colored backing card.

Start by using a larger and stronger pin to make a hole through the stem at a 45 degree angle.  Make a hole with the same pin through the bottom of the place card as well.  Then using a hot glue gun, place a few drops of glue on the back of the place card and then stick the card to the pumpkin stem and secure with a smaller pin. We actually ended up sticking the back of the pin into the pumpkin (so secured it at an angle).  The place cards didn't move even after transport!  Happy Fall!!

.


Monday, September 23, 2013

Pumpkin Granola

I just bought a flat of pureed pumpkin at Costco....who does that?!  At least my obsession is a healthy one.

I made a batch of this pumpkin granola a few days ago, it is gone and I need to make more. It tastes deliciously like fall and you can put it on yogurt, ice cream, eat it plain or with milk.  Enjoy.  

Ingredients:
5 cups rolled oats
1 1/2 teaspoons pumpkin pie spice
1 teaspoon cinnamon
1/4 teaspoon nutmeg
3/4 tsp. salt
3/4 cup dried cranberries
1/2 cup pepitas
1/4 cup pecans
3/4 cup brown sugar
1 cup pumpkin puree
1/4 cup maple syrup
1 teaspoon vanilla extract


Preheat the oven to 325° F. Line a large baking sheet with parchment paper and set aside.  In a large bowl, combine oats, spices, and salt, cranberries, pepitas, pecans. Mix well.

In a medium bowl, whisk together brown sugar, pumpkin puree, maple syrup and vanilla extract. Whisk until smooth. Pour wet ingredients into oat mixture and stir until the oats are evenly coated. They will be moist. Evenly spread the mixture onto the prepared baking sheet.

Bake for 20 minutes. Remove pan from the oven and stir. Bake for an additional 15-20 minutes or until the granola is golden and crisp. Remove from the oven  and let cool completely. Store in an airtight container.


Wednesday, September 18, 2013

pumpkin & dark chocolate tiramisu


Unfortunately for my waistline, I saw this recipe in Rachel Ray's October Everyday Food Magazine. I saw it, loved it, made it, loved it, ate it and LOVED It.
Make this for your next fall dinner party or family gathering!

Ingredients
3.5 ounces Dark Chocolate (50-60% cacao)
3/4 cup Hot Coffee
5 tablespoons Bourbon
1 1/2 cups mascarpone
2/3 cup heavy cream
1 cup powdered sugar
1 1/2 teaspoon vanilla extract
1 cup pumpkin puree
1/2 teaspoon ground cinnamon
1 package (7 oz) Italian ladyfingers

(about 24 cookies)

Instructions
On a cutting board, coarsely chop chocolate. Whisk chocolate into hot coffee until melted. Stir in 2 tablespoons bourbon. In large mixing bowl, combine mascarpone, cream, vanilla, cinnamon, pumpkin and 3 remaining tablespoons of bourbon. Mix with an electric mixer on medium speed, beat until fluffy, 1 to 2 minutes. Add pumpkin puree; mix on medium-low until blended and creamy. Pour coffee mixture into a deep dish. Dip ladyfingers into coffee mixture until soaked but not soggy (about 3-4 seconds). Arrange in single layer in bottom of 6 - 8 oz glasses, breaking cookies if needed. Top layer with pumpkin mixture. Grate about 1/3 of the remaining chocolate evenly over the pumpkin mixture. Repeat layers twice more with the remaining cookies, pumpkin and chocolate. Cover and refrigerate for at least 4 hours and up to 2 days. Serve cold.


Monday, September 16, 2013

Butternut & Kale Lasagna (healthy)

We hosted family dinner last night and I wanted to make something warm and comforting but also healthy.  I found this recipe on cookinglight.com and the combo of earthy kale and sweet squash was delicious.
Let the comfort food season begin!

I altered the recipe slightly (roasted squash vs. microwave added in herbs etc.)  

Butternut & Kale Lasagna (adapted from cookinglight.com)
(serves 8-10)


Ingredients
4 cups chopped fresh butternut squash
6 cups chopped kale
a bunch of fresh herbs (sage, rosemary, tarragon)
4 tablespoons olive oil
3 tablespoons minced garlic
1/2 cup all-purpose flour
5 1/2 cups 1% low-fat milk
4 ounces Gruyère cheese, shredded and divided
2 ounce Parmigiano-Reggiano cheese, grated
1 teaspoon salt
1/2 teaspoon black pepper
Cooking spray
12 no-boil lasagna noodles
6 tablespoons chopped pecans


Preheat oven to 400 degrees

Place squash in a large bowl and toss with 2 tbs of olive oil and fresh herbs. Spread squash onto baking sheet and season with salt and pepper.  Roast squash in the oven for 30 minutes (shaking pan occasionally) and remove from the oven. Combine squash and kale in a large bowl. 

Preheat oven to 450 degrees

Heat a medium saucepan over medium heat. Add oil to pan; swirl to coat. Add garlic; cook 2 minutes or until garlic begins to brown, stirring occasionally. Weigh or lightly spoon flour into a dry measuring cup; level with a knife. Combine flour and 1 cup milk in a small bowl, stirring with a whisk until smooth. Add milk mixture and remaining 4 1/2 cups milk to pan; increase heat to medium-high. Bring to a boil; cook 1 minute or until thickened, stirring frequently. Remove from heat. Stir in 2 ounces Gruyère, Parmigiano-Reggiano cheese, salt, and pepper; stir until cheese melts.

Coat 9x13 baking dish with cooking spray. Spread 1/3 cup milk mixture in bottom of dish. Arrange 3 noodles over milk mixture; top with half of squash mixture and 1 1/3 cup milk mixture. Repeat layers once, ending with remaining noodles and remaining milk mixture. Cover with foil; bake at 450° for 15 minutes. Remove foil; sprinkle remaining Gruyère and pecans over top. Bake, uncovered, at 450° for 10 minutes or until lightly browned and sauce is bubbly. Let stand 5 minutes.


For more of our favorite squash recipes, click here, here, here, here and here