Sunday, April 29, 2012

The best chocolate chip cookie recipe (for real!)

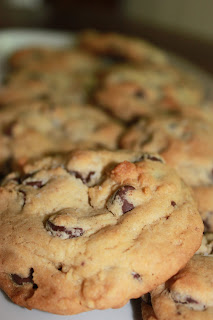
I was reading a blog that Bridget got me hooked on, Cupcakes and Cashmere , and there was a recipe posted for "The best Chocolate Chip Cookies....Ever".  I was skeptical, just like I am when I see claims like "the world's best cup of coffee" etc, but in an effort to impress our weekend guests from Chicago, I decided to try the recipe.
The cookies turned out amazing.  I mean really, really good.  They were by far the best chocolate chip cookies I have ever made, and probably the best chocolate chip cookies I have ever tasted. The recipe wasn't too different from other recipes I have tried, but a few slight variations seemed to make a huge difference. One thing to note is that the recipe calls for the dough to be chilled for about 36 hours, so you need to plan ahead when making these. I am not going to re-type the recipe, because it is perfect as is, so here is the link that will turn you into a chocolate chip cookie snob! Make sure to read Kate's secrets/suggestions in red.


Planning a party - Chalkboard Appetizer Labels

One of my good friends from work is getting married so we decided to celebrate her with a bachelorette party/wedding shower! It is less than a week away and I am trying to do a lot of the work a head of time, since Anne is coming in town to join in on the celebration!! As I scanned my "to do" list I decided that making appetizer labels was something that I could do a week before the party. After doing some searching on Pinterest I decided that I would do so by making mini chalkboards. 


I took at quick trip to Michaels and left with small frames, chalkboard paint and some spray paint (to repaint the frames).  Karen (the bachelorette) is fun, spunky and energetic, so I thought that pink would be the perfect color theme for the party (along with black and charcoal grey). 

 - I started by spray painting the frames the fun pink color.

 
- Then I painted the inside portion of the frame with chalkboard paint such as Martha Stewart Chalkboard paint using a sponge brush. 3-4 coats

- Once the paint dried, they were ready to use!


Other ideas for chalkboard paint:
- Labeling flower pots
- Painting inside of cabinet for grocery list
- Making a fun chalkboard

Thursday, April 26, 2012

Country French Bread

I have always wanted to try to make crusty french bread and after a short baking hiatus while in Fla, I was in the mood to try something new.
I used the Country French Bread recipe from the sono baking company cookbook.  My first attempt failed, because I didn't let the yeast and water "proof" long enough, so the bread didn't rise.  After figuring out what proofing meant, I made attempt number two and once again the bread did not rise. I attributed this failure to the fact that I did not knead the bread long enough. I actually had to watch a video on how to knead as well as how to determine if the dough was sufficiently kneaded. On my third and final attempt, the bread turned out amazing! The outside of the bread is crusty and crunchy and the inside is soft and chewy.
The recipe is not difficult.  I was just an inexperienced bread maker and I didn't have the required techniques down. Give it a try!


Country French Bread

2 tsp active dry yeast
1 1/4 cups warm water
2 tbs olive oil
3 1/3 cups bread flour
1 tbs coarse salt
Cornmeal for the baking sheet


  1. In a medium bowl, combine the yeast and 1 cup of the warm water and let proof for 5 minutes
  2. When the yeast has proofed, add the olive oil and remaining 1/4 cup water. Combine the flour and salt in the bowl of a standing mixer fitted with the paddle attachment. Add the wet ingredients and beat on medium speed for 1 to 2 minutes, until the ingredients are well combined.  The dough should be tacky but not sticky when you touch it, and damp enough that the dough attaches to the side of the bowl with strings. Add water by the tablespoon if necessary
  3. Turn the dough out onto an ufloured work surface. Knead bread for 5 - 7 minutes (see video link above), or until dough is smooth and springy.  Stretching it gently, fold in the left and right sides of the dough to the center, then the top and bottom, to make a rough ball. Place the dough smooth side down in a lightly oiled bowl and turn the dough over so that the smooth side faces up and both sides are coated with oil. Cover with oiled plastic wrap and let rise in a warm place (at least 70 degrees), until increased in bulk by 1 1/2 times
  4. To deflate the dough, use a plastic pastry scraper to fold the top down, bottom up, and the sides in. Turn the dough in the bowl so that the smooth side faces up. Cover with plastic wrap and let rise again until increased in bulk by 1 1/2 times.
  5. Sprinkle baking sheet with cornmeal.
  6. To shape the boule, turn the dough out onto an unfloured work surface so that he top is facing down.  Fold in the top, bottom and sides, as you did before.  Turn the dough right side up. Quickly shape it between the palms of your hands into a round. Place your hands, palms up on either side of the dough round. Then move your hands together so that they tough underneath the dough and give the dough a quarter turn.  This will tighten the dough into a nice, firm ball. Do this two more times.  Place it on the prepared baking sheet. Cover and let rise again in a warm place until dough has increased in bulk by 1 1/2 times and remains indented when you press gently with a finger 30 to 45 minutes.
  7. Set an oven rack in the middle position. Preheat the oven to 500 degrees
  8. When dough has risen, use a knife to cut a slash in the top of the boule. Sift flour lightly over the top and place the baking sheet in the oven. Once inside, reduce heat to 450 degrees. Bake rotating the baking sheet about 2/3 of the way through the baking time, until the bread feels light and sounds hollow when tapped on the bottom, about 25 minutes.  Cool on a wire rack.

Sunrise Muffins

I am always on the lookout for healthy recipes, and this one has become a family favorite. Frances (my toddler) loves these muffins, which makes me happy because they contain both fruits and vegetables. My recipe is derived from a Martha Stewart recipe http://www.marthastewart.com/339779/healthy-morning-muffins , with a few personal tweaks. Eating a hearty Sunrise muffin for breakfast is a great, low fat, vitamin-packed way to start your day.

Sunrise Muffins
1 1/4 cup all purpose flour
1/2 cup packed brown sugar
1/2 tsp baking soda
1/2 tsp baking powder
1/2 tsp course salt
1/2 tsp nutmeg
1 tsp cinnamon
1 cup old fashioned oats
1 large egg
1/3 cup unsweetened applesauce
1/3 cup milk
3 tbs olive oil
3 medium carrots shredded (can substitute zucchini)
2 medium bananas mashed
1/2 cup raisins (use any dried fruit - cherries, pomegranates)
1/2 cup unsweetened coconut

Preheat the oven to 400 degrees. Coat a 12-cup muffin pan with cooking spray. In a large bowl, mix flour, brown sugar, baking soda, baking powder, salt, nutmeg and cinnamon, until there are no lumps.

Stir in remaining ingredients one a time and mix until blended.  Fill each muffin cup with 1/4 cup batter. Bake until a toothpick inserted in center of muffin comes out clean ( about 23-25 minutes)

Tuesday, April 24, 2012

Asian Flavored Fish

I was looking for some healthy recipes, hoping to get myself in shape, so I asked Jenny if she had anything new and fun. Luckily for me she had just gotten a couple of steamed fish recipes from our Aunt Jeanne that were quick, easy, with minimal clean up. After convincing my friend Jen to go to a spin class with me, I dragged her over for dinner and vino to try the recipe and it was delicious, quick, and filling! This recipe makes two servings.

2 firm fish filets (5-6oz each) - Salmon worked great
1 cup cooked rice
2 cups bok choy
2 scallions chopped
1 T veggie oil
1 T grated fresh ginger root
1 clove garlic, minced
2 T soy sauce
2 teaspoon dark sesame oil

To Bake:
  • Heat oven to 450
  • Cut two sheets of foil about 14x14 for each pouch - I use the one side parchment, one side foil
  • Place 1/2 of rice in center of each
  • Layer 1/2 of each on rice: greens, fish, scallions
  • Combine oil, ginger, garlic, soy sauce, sesame oil and pour over fish
  • Close pouch tightly on all ends
  • Place pouches on baking sheet and cook about 20 min

Saturday, April 14, 2012

Broiled Grapefruit

I am spending a few weeks in sunny Florida visiting my Mother in-law with the girls, and I feel so lucky to wake up every morning to sunshine and warmth. An added perk to the warm temps and great company are the citrus trees right outside the front door.  The fruit is incredibly juicy and ready to eat off the tree.

This morning I decided to start off my day with a broiled grapefruit. I had never tried it before and it is incredibly easy and amazingly good. The top of the fruit becomes caramelized, almost like creme brulle and the tart juice balances out the sweetness of the sugar.  The recipe is as follows;

1 grapefruit halved
2 T sugar
1 T brown sugar
Pinch of sea salt


Place grapefruit in a baking dish, fruit side up. Mix sugars together in a small bowl and spoon on top of grapefruit halves. Press sugar firmly into fruit. Broil at 500 degrees for 3-4 minutes, or until sugar starts to brown. Remove from the oven and sprinkle with salt. Serve with mint and enjoy.


* Also good with greek yogurt on top

Sunday, April 8, 2012

Carrot Cake Cupcakes

For Easter this year, Chris and I decided to have some of our friends over for brunch. After planning the menu with the help of Jenny, I realized I was missing dessert! Since Chris is not a fan of coconut, I consulted the Sono Baking Company Cookbook for other recipes and found this one for Carrot Cake Cupcakes. It is was easy and delicious. Enjoy!

Cupcakes

1 1/4 cups cake flour
3/4 teaspon baking soda
3/4 teaspoon baking powder
3/4 teaspoon coarse salt
1/4 teaspoon cinnamon
1/8 teaspoon grated nutmeg
1/3 cup golden raisins
8 ounces (about 3 medium) carrots, peeled and shredded
1/3 cup sour cream
1 cup granulated sugar
1/2 cup vegetable oil
2 large eggs


Cream Cheese Frosting

8 ounces cream cheese at room temperature
1/2 cup unsalted butter at room temp
pinch of salt
3 cups confectioners' sugar
grated zest of 1 orange
2 teaspoons finely grated fresh ginger
12 carrot peels, approximately 3 inches in length

1. Preheat oven to 350 degrees and coat 12-cup muffin pain with nonstick cooking spray.

2. In a medium bowl, sift the flour with the baking soda, baking powder, salt, cinnamon and nutmeg. Stir in raisins.

3. In a large bowl, whisk grated carrots, sour cream, sugar, oil and eggs. Fold in the dry ingredients with a spatula until the flour is absorbed.

4. Place prepared muffin pan on a baking sheet and fill muffin tins.

5. Bake for 18 to 22 minutes rotating the sheet about 2/3s of the way through the baking time. Bake until the tops of the cupcakes spring back when touched and the cake tester comes out clean. Transfer the pan to a wire rack to cool for 10 minutes.

For the frosting: beat the cream cheese using the paddle attachment on a standing mixer, with the butter and salt until light and creamy, approximately 2 min. Add the sugar and beat for 1 minute. Beat in the grated zest and ginger. Lastly roll each carrot peel and place atop the cupcakes. Mmmmm

Bridget's Hints:
For shredding the carrots I used a grater as suggested, but after discussing this with several other people they suggested putting the carrots in a food processor. Genius! I substituted greek yogurt for the sour cream and the cupcakes were moist and fantastic. Finally, I have always had an issue with filling the muffin tins to high and they overflow. I have found that if you use a large cookie scooper it gives you just the right amount of batter and they turn out perfectly sized (making cleanup so much easier)!


Tuesday, April 3, 2012

Coasters

Making coasters was my obsession this fall, mainly because I found them to be perfect handmade gifts. I had taken a break from making them, but now I'm back at it for a couple more gifts. I have made a variety of different types of coasters using photos, scrapbook paper and my personal favorite, maps.

What you will need:
  • 4-6 Tiles (19 cents at home depot)
  • Mod podge
  • Clear acrylic sealer gloss
  • Glue
  • Sponge brush
  • Circular thin cork or felt squares
  • Pictures, maps or paper of your choice!
Trim paper or picture to fit the tiles. Next place one layer of Mod Podge on the tile and while it is still wet place the paper on the top of the tile and flatten it out as much as possible. Wait for it to dry completely. Brush a layer of Mod Podge on top of the paper and repeat this with the remainder of the tiles. It is very important to let the mod podge dry completely in between coats(this is hard for me seeing as though i am a little impatient!) You will do a total of 2-3 coats of Mod Podge for each coaster.

After all of the tiles are completely dry spray them with the sealer gloss. I have been using three to five coats of the gloss, letting them dry in between. The gloss is an important step,because it keeps the coasters water proof. The final step is to glue the cork or felt on the bottom of the tile,and once they are dry they are ready for a beverage!

Monday, April 2, 2012

Quick Dining Room Update - Simple Placemats

I found some great inexpensive fabric at the Florence Eiseman sale a few weeks ago and I wasn't sure what I wanted to do with it. My mom suggested making placemats, which I thought was a great idea! The fabric is fairly light weight, so I ran to the fabric store to purchase some mid-weight interfacing, in order to make the placemats more substantial. I decided to make them reversible with the same pattern on each side (only because I LOVE the fabric), but you can definitely mix it up and have two separate looks. Here are the tools/items you will need to make 6 placemats:
  • 2 1/2  yards of fabric  
  • 2 1/2 yards of interfacing
  • Thread
  • Iron
  • Press cloth
  • Sewing Machine
The instructions on how to make the placemats are as follows;
  1. Cut twelve 15x20 inch rectangles from your fabric
  2. Cut six 14x19 inch rectangles from your mid-weight interfacing
  3. Heat your iron to the wool/steam setting. Place the rough side of the fusible interfacing against the wrong side of 6 printed fabric rectangles. Lay the two pieces down with the interfacing on top. You should have 1/2 inch of fabric showing from underneath the interfacing on all sides.
  4. Dampen a press cloth (usually muslin) and lay over interfacing. Start at one corner and press the iron down firmly holding it still over that area for 15 seconds. Lift the iron straight up, and repeat the process over a different area. Keep doing this to press the entire piece of fabric. Hint: press cloth should be dry after 15 seconds of pressing.
  5. Take two pieces of fabric (one with interfacing, one without) and place the right/printed sides together. Pin all edges in order to hold them together.
  6. Sew around the edges with a 1/2 inch seam allowance. Make sure to leave a 3-inch opening in order to turn the placemats right-side-out. (I usually reinforce the area outside the opening, so the stitching doesn't come out).
  7. Turn the placemat right side out through the 3-inch opening. Use a dull knife/scissors to push out the corners. Turn the fabric edges along the opening to the inside of the placemat 1/2 inch. Iron the folded edges and the rest of the placemat to smooth the seams and hold the folds.
  8. Sew around the placemat with an 1/4-inch seam allowance.
It took me 2 1/2 hours to complete 6 placemats and now we are ready for Spring!

Sunday, April 1, 2012

Rice Pudding

One of my favorite desserts as a kid was my mom's rice pudding. She would make it when we had left over rice from a big family dinner.  I don't know if it is because it was cloudy this morning or because I am feeling a bit nostalgic, but I am in need of some comforting goodness.  Seeing as my mom is on the beach right now and she is unable to provide her recipe, I am going to use a recipe from John Barricelli's SONO Baking Company Cookbook.

Rice Pudding (Serves 6)
4 cups milk
1/2 cup long grain rice
1/2 cup sugar
1 T pure vanilla extract
1 cinnamon stick
2 large egg yolks
1/2 cup heavy cream
1/4 cup unsalted butter
1/2 cup dried apricots (optional)
1/2 cup dried cherries  (optional)

  1. In a saucepan, bring the milk to a simmer with the rice, sugar, salt, and cinnamon. Reduce heat and simmer until rice is tender (15-20 minutes)
  2. In a medium bowl, whisk the egg yolks with the cream. Pour the rice mixture into the bowl with the yolks, gradually at first, and then more quickly, whisking constantly. Return mixture to saucepan and cook over medium heat, stirring until the custard thickens enough to leave a trail when you run your finger across the back of the spoon (about 2 minutes). Remove from heat, whisk in vanilla and butter. Fold in dried fruits if desired.
  3. Transfer into clean bowl, cover with plastic wrap and chill. Serve with cinnamon and whipped cream.