Saturday, December 22, 2012

Ginger Snaps

I know, I know, I am a slacker! It was my idea to do the 25 days of Christmas and time has just got away from me!  Luckily I was able to make it WI despite the winter storm "Draco" (Malfoy is still messing with us!) and I still have been slacking. We have been busy snow shoeing, playing in the snow and keeping busy with family.

On Thursday when we were snowed in, so I grabbed the St. John's Cookbook from my Grandma and started paging through it. Life moves so fast, and I had never taken the opportunity to sit and read through the different recipes.  So, I spent about an hour paging through the different recipes and it was such a perfect thing to do while snuggled inside! We have to bring cookies to all of our family functions, so I decided to try the Ginger Snaps.  I noticed that the recipe called for 3/4 cup Spry. Hmmm,  spry.....I have never heard of it. I tried googling it and there were not any helpful explanations (they gave me "nimble").  So I called an expert, my grandmother, and of course she new exactly what it was; a brand of lard or butter used back in the 40's and that I should substitute butter. Note to self: Grandmothers know everything!


These cookies turned out perfect and will now be added to the Christmas favorites. Happy Holidays and Merry Christmas!

Thursday, December 20, 2012

almond crescents


The recipe I use for these cookies is out of a 1958 Christmas Cookies book, distributed by the Wisconsin Electric Power Company.   I bought it at a thrift sale for $1 and on the inside flap it says "Be Modern....Cook Electrically".  This book has a lot of the great cookies that my Grandmas used to make and the recipes are simple and more importantly, they have stood the test of time. 
My mom has made almond crescents for as long as I can remember, and we only have them at Christmas.  I have been having one or two in the morning with my coffee (an amazing pairing), so I am going to go through withdrawal once this crazy holiday season comes to an end.

Almond Crescents (Christmas Cookies - Wisconsin Electric Power Company) 

1 cup butter (2 sticks)
1/2 cup sugar
2 tsp almond extract
1/4 tsp salt
2 1/2 cups sifted all-purpose flour
1/2 cup blanched almonds, slivered
1 cup powdered sugar

1. Cream butter.  Add sugar gradually and cream for 4 minutes.  Add in almond extract.
2. Add salt, flour and almonds. Blend
3. Shape into crescents.  Use about 1/2 tablespoon of dough
4. Place on parchment paper/silicone baking mat
5. Bake at 300 degrees for 18-20 minutes 
6. Roll crescents in powdered sugar while hot
7. Makes 7 dozen.

* I did make a few slight adjustments to modernize the recipe (silicone baking mat etc.)


Wednesday, December 19, 2012

Peanut Butter Fudge

What if I told you that I could give you the secret to having something smooth, rich and extremely satisfying - No, I am not talking about Daniel Craig (I would not share him), I'm talking about Peanut Butter Fudge.
The holidays are just not complete without fudge.  This recipe only takes 4 minutes to make (plus cooling time), so it is an easy treat to make and bring to your family gatherings :) 

Ingredients


Directions

Monday, December 17, 2012

Chocolate Ginger Cookies

These chewy cookies are a Christmas favorite in my house.  I love the combination of ginger & chocolate and the cookies have a little zip that separates them from the sweet, sweetness of the season.

Enjoy! 

Recipe is from Cookie Confessions

Chocolate Ginger Cookies

2 cups flour
1/4 cup cocoa powder
1 1/2 tsp baking soda
1/4 tsp salt
2 tsp ground ginger
3/4 tsp cinnamon
1/2 tsp cloves
3/4 cup butter, room temperature
1 cup sugar
1 large egg
1/4 cup molasses
2 tsp balsamic vinegar
1 tsp vanilla
1/3 cup semisweet chocolate, chopped or mini chips (I added more - about 2/3 cup)
additional sugar for rolling

Preheat oven to 350 degrees F. Line a baking sheet with parchment paper.

In a medium bowl, sift together flour, cocoa powder, baking soda, salt and all spices, set aside. In a large bowl, cream together butter and sugar until light. Beat in egg, followed by molasses, vanilla and balsamic vinegar. Gradually stir in the sifted dry ingredients mixing until flour is incorporated. Stir in chocolate chunks. Scoop dough into balls and roll in sugar. Press lightly to flatten and bake for 10-12 minutes.


Sunday, December 16, 2012

Cranberry Pudding

Last year our mom made this amazing desert for Christmas, making it a new holiday favorite.  It is rich and sweet at the same time, an absolute crowd pleaser. It is easy to prepare ahead of time - just store in the refrigerator.

Pudding:
2 cups raw cranberries (16 oz)
1 1/2 cup white sugar
1/2 cup chopped pecans
2 eggs
12 tablespoons butter, melted (1 1/2 stick)
1 teaspoon baking powder
1 cup flour

Topping:
1 cup white sugar
1/2 cup butter
1/2 cup half and half
1 teaspoon vanilla

Preheat oven to 325. Grease a 9 x 11 pan generously with butter. Toss the cranberries, 1/2 cup white sugar and pecans in a bowl. Spread across the bottom of the prepared pan.

With a standing mixer, beat eggs, 1 cup sugar and butter. Reduce speed to low and add flour and baking powder. Mix until just combined. Pour mixture over cranberries. Bake until golden brown, approximately 40 minutes.

When you are ready to serve the desert, bring 1 cup of sugar and 1/2 cup butter to a boil, stirring for one minute. Stir in cream and vanilla.  Serve warm over pudding


Thursday, December 13, 2012

Martha's Mac & Cheese

I made this creamy mac and cheese for Hattie's birthday party last weekend and it was fabulous.  I found the  recipe on Smitten Kitchen's website and she adapted her recipe from the one and only Martha Stewart!

I baked the mac and cheese in a 9x11 pan and once it was done, I transferred it into individual ramekins for serving.  I also used panko bread crumbs instead of making my own bread crumbs (SLACKER!!) and I was super happy with the result. 


Serves 12

8 tablespoons (1 stick) unsalted butter, plus more for casserole
6 slices white bread, crusts removed, torn into 1/4- to l/2-inch pieces
5 1/2 cups milk
1/2 cup all-purpose flour
2 teaspoons coarse salt, plus more for water
1/4 teaspoon ground nutmeg
1/4 teaspoon freshly ground black pepper
1/4 teaspoon cayenne pepper
4 1/2 cups (about 18 ounces) grated sharp white cheddar cheese
2 cups (about 8 ounces) grated Gruyère or 1 1/4 cups (about 5 ounces) grated Pecorino Romano cheese
1 pound elbow macaroni
1. Preheat oven to 375°F. Butter a 3-quart casserole dish; set aside. Place the bread in a medium bowl. In a small saucepan over medium heat, melt 2 tablespoons butter. Pour the melted butter into the bowl with the bread, and toss. Set the breadcrumbs aside.
2. Warm the milk in a medium saucepan over medium heat. Melt the remaining 6 tablespoons butter in a high-sided skillet over medium heat. When the butter bubbles, add the flour. Cook, stirring, 1 minute.
3. While whisking, slowly pour in the hot milk a little at a time to keep mixture smooth. Continue cooking, whisking constantly, until the mixture bubbles and becomes thick, 8 to 12 minutes.
4. Remove the pan from the heat. Stir in salt, nutmeg, black pepper, cayenne pepper, 3 cups cheddar cheese, and 1 1/2 cups Gruyère (or 1 cup Pecorino Romano); set the cheese sauce aside.
5. Cover a large pot of salted water, and bring to a boil. Cook the macaroni until the outside of pasta is cooked and the inside is underdone, 2 to 3 minutes. Transfer the macaroni to a colander, rinse under cold running water, and drain well. Stir the macaroni into the reserved cheese sauce.
6. Pour the mixture into the prepared dish. Sprinkle the remaining 1 1/2 cups cheddar cheese, 1/2 cup Gruyère (or 1/4 cup Pecorino Romano), and the breadcrumbs over the top. Bake until golden brown, about 30 minutes (though we needed a bit more time to get it brown, but your oven may vary). Transfer the dish to a wire rack for 5 minutes; serve.

Wednesday, December 12, 2012

Teacup Candles

After being inspired by one of our favorite blogs, Cupcakes and Cashmere, I decided to give this fun project a try. I love hunting around at Goodwill this time of year, because the decorations are inexpensive and a lot of them can be modified/repurposed as gifts! I have a busy schedule this season, so these candles were the perfect project for me because they are quick and easy to make. Cupcakes and Cashmere has a great tea cup candle tutorial, so please see the attached link.

* notes to accompany the tutorial  - I purchased and used a candle making kit from Michaels, and I used a double boiler to melt the wax.


Tuesday, December 11, 2012

Eggnog Cranberry Muffins

After reading Bridget's post yesterday about healthy muffins and how most people gain a pound or two during the holiday season, I thought about trying to find another waistline-friendly treat.  Instead, I googled "what can you bake with eggnog" and I came up with this amazing recipe from Annie's Eats. These muffins taste like Christmas, so if you are craving an early taste of the holidays, try these instead of lighting and inhaling yet another fir tree scented candle.  I only made two small changes to the recipe - I used low fat eggnog (bridget will be so proud) and I did not use pecans in my streusel topping.

Eggnog Cranberry Muffins

Ingredients:

For the muffins:
2¼ cups all-purpose flour
1 tbsp. baking powder
¼ tsp. salt
1 cup plus 2 tbsp. granulated sugar, divided
2 large eggs
¾ cup eggnog
5 1/3 tbsp. unsalted butter, melted
1 tsp. almond extract
1½ cups coarsely chopped cranberries

For the topping:
½ cup sugar
½ cup all-purpose flour
½ tsp. ground cinnamon
4 tbsp. unsalted butter, slightly softened
½ cup chopped pecans (optional)

Directions:
Preheat the oven to 400° F. Line 14-16 muffin cups with paper liners. In a medium mixing bowl, combine the flour, baking powder and salt; stir to combine. In a large mixing bowl, combine 1 cup of the sugar, eggs, eggnog, melted butter and almond extract. Stir until well combined. Mix in the dry ingredients just until incorporated. Toss the chopped cranberries with the remaining 2 tablespoons of sugar, and fold into the batter. Divide the batter evenly between the prepared muffin liners, filling them about two thirds of the way full.

To make the streusel topping, combine the sugar, flour, cinnamon and butter. Cut the butter into the dry ingredients until a coarse, crumbly mixture forms. Stir in the pecans if using. Sprinkle the mixture evenly on top of the muffin batter.
Bake for about 18-22 minutes, or a until a toothpick inserted in the center comes out clean. Let cool in the pan for 5-10 minutes, then transfer to a wire rack and let cool completely.


Monday, December 10, 2012

Healthy Blueberry-Banana Muffins

Oh the weekends...they always get me! Especially during the holiday season with cookie exchanges and holiday parties galore.  Did you know the average weight-gain from Thanksgiving to Christmas is only 1 lb.  I read this in Real Simple Magazine and for some reason I was surprised that it was only 1 lb. Maybe it is because I personally, do not have any self control and maybe the average person does?!  Or, maybe it is because people ramp up their workouts to compensate for what they are eating?  I try to have a good balance of both, but the holidays ALWAYS get me.  (Good thing a new season of biggest looser starts in January to motivate me!!)

This morning, after a weekend of overeating, I wanted to make something healthy that I could eat mid-morning and that would be easy to grab and eat on the go.  I stumbled upon this recipe on Marthastewart.com and I made a couple of substitutions to make it even healthier than the recipe already was. Happy Monday!

Ingredients:
1 cup whole wheat flour
3/4 cup all purpose flour
1/4 cup flax seed (partially crushed in a food processor)
1 teaspoon baking soda
1 teaspoon cinnamon
1/2 teaspoon salt
1/4 cup butter at room temperature
1/4 cup Greek yogurt
1/3 cup sugar
1/3 cup brown sugar
2 eggs
2 bananas
1 teaspoon vanilla
1/3 cup milk
1/2 cup oatmeal
1 cup frozen blueberries

Preheat oven to 375.  Whisk first six ingredients in a medium sized bowl and set aside. In a separate bowl smash two bananas (should make 3/4 cup). Add vanilla and milk.

Meanwhile in a standing mixer with paddle attachment, mix butter, yogurt, and sugars until well mixed (2-3 min). Add each egg one at a time.

Reduce mixer speed to low. Add dry ingredients alternating with banana mixture. Add oatmeal last and mix until just combined. Fold in frozen blueberries.


Divide batter in muffin tins (sprinkle sanding sugar on top) and bake for 25-28 minutes or until a tooth pick comes out clean. ENJOY!

Sunday, December 9, 2012

Neiman Marcus Dip

I found this recipe in the Chicago Junior League cookbook.  It is a great appetizer to serve any time of the year.  I mean really, how can you go wrong with the combination of cheddar and bacon?!  I usually serve it with a few different types of crackers, pita or pretzle chips.  After this weekend, I am thinking that I might have to pull out the maternity pants - which makes me nervous because it is only Dec 9th. 

Neiman Marcus Dip
1 cup shredded cheddar cheese
3 slices of bacon, crisp cooked and crumbled
1/2 cup mayonaise
1/4 cup chopped almonds
1 Tbs chopped green onion

Combine the cheese, bacon, mayonaise, almonds and green ionion in a bowl and mix well. 
Serve with crackers of your choice. 

Saturday, December 8, 2012

Sour Cream Coffee Cake

This is the time of year when many of us have out of town guests, and we are looking for something easy to make for breakfast.  This coffee cake is perfect for your guests and it is so delicious, that  I couldn't stop eating it.  I substituted half of the sour cream with Greek yogurt, which made it extra moist! I used my bunt pan since I do not have a tube pan and it still looked good, but if you do have a 10-inch tube pan with a spring form bottom use that. (Note to self - register for one!)

Topping:
1/2 cup light brown sugar
2 teaspoons ground cinnamon
1 cup pecans, finely chopped

Cake:
1 cup sour cream
1 cup plan Greek yogurt
3 1/2 cups cake flour, sifted
1 tablespoon baking powder
1 cup (2 sticks) unsalted butter - room temperature
2 cups granulated sugar
2 teaspoons coarse salt
4 large eggs - room temp
1 1/2 tablespoons pure vanilla extract

1. To make top mix ingredients with a fork and set aside.  Set the oven rack in the middle position and preheat to 350 degrees. Prepare tube pan or bunt pan.

2. To make the cake first combine sour cream and baking soda; set aside.  Whisk together the cake flour and baking powder in another bowl and set aside.

3. Use your standing mixture with the paddle attachment, beat the sugar, butter and salt on medium-high until light and fluffy for 2-3 minutes. Scrap down the sides of the bowl half way through. Add the eggs one at a time, beating after each addition. Add vanilla.

4. Reduce mixer speed to low and add the dry ingredients in three batches, alternating with the sour cream mixture and beating well after each addition.

5. Since I had my bunt pan I sprinkled some of topping in the base of the pan. Scrape half of the batter in the prepared pan.  Sprinkle with the remainder of the topping mixture and gently swirl the mixture with a knife.  Add remainder of the batter and smooth out the bottom to make it as flat as possible.

6. Place the pan on a baking sheet and bake, rotating the sheet about 2/3rds of the way through. Bake for 50-60 minutes or until the cake springs back and a tester comes out clean.  Cool on a wire rack .


Friday, December 7, 2012

Snowman Cookies

We are having a winter Onederland themed birthday party for our 1 year old little girl tomorrow, and I thought these cookies would be a cute addition to our dessert table. Minimal effort went into making them, which was a bonus for me, because I have about a million things to do before the party.   I still need to trim the extra chocolate from around the cookie, or maybe I'll just call them my melting snowman.

Ingredients:
Double Stuffed Oreos
10 oz bag of white chocolate Chips
Gel/Frosting for decorating

Directions
1. Melt the chocolate according to the directions on the packaging
2. Dip the double stuffed oreos into the melted white chocolate
3. Let the chocolate harden and decorate as desired. 


Thursday, December 6, 2012

Peanut-butter pretzel candies

These delicious treats go by such names as Buckeyes, peanut-butter balls, or I am thinking of renaming them reindeer balls in honor of the season. Thoughts?? The addition of pretzels and salt with the chocolate makes them absolutely addicting.  It was as if Tommy, my golden-doodle,  knew how good they were going to be.   After I pulled the peanut-butter out of the cupboard he was in the kitchen looking on top of the counter to see what I was up to.  Luckily I had his peanut butter filled Kong in the freezer so I was able to distract him with his own peanut-butter treat. This recipe makes about 16 balls and is easily doubled if needed. This recipe was adapted from Martha Stewart. These are going to be a must for this holiday season and for many years to come. 

Ingredients:
1 cup peanut butter
1/2 cup + 2 Tbsp powdered sugar
2 tbsp butter, room temperature
1-2 cups crushed pretzels
10 oz chocolate chips

Combine peanut butter, sugar and butter in a medium bowl and stir. I found it hard to stir so I used my hands to mix until well combined. Add crushed pretzels and mix well. Roll into 1inch balls. Freeze for 30 minutes.

After 30 minutes melt the chocolate chips with a double boiler, stirring constantly until all chips are completely melted. Roll the balls in the chocolate until fully covered and place on wax paper to dry. Store in the refrigerator.


Wednesday, December 5, 2012

chocolate-dipped coconut macaroons


These moist & chewy macaroons from the sono baking company cookbook are delicious and they would be a delightful addition to any holiday dessert table.   I must warn you, that it is hard to stop eating these coconut morsels - which is why I am sending my extras to work with the hubby tomorrow :)
Ingredients
1 cup (6 to 7 large) egg whites, at room temperature
1/2 cup sugar
1/4 cup light corn syrup
3 Tbsp unsalted butter
8 oz unsweetened finely shredded dried coconut
11/2 Tbsp vanilla extract
1/2 recipe Chocolate Glaze

Directions
  1. Bring one inch of water to a simmer in the bottom of a double boiler.   Combine egg whites, sugar, corn syrup and butter in the top of the double boiler, set it over, not in the simmering water and heat, whisking constantly until the mixture reaches 140 to 150 degrees on a candy thermometer (about 15 minutes)
  2. Transfer to the bowl of a standing mixer fitted with the paddle attachment. Add the coconut and vanilla extract.  Beat on low speed until the mixture has cooled, about 10 minutes. The mixture will have coalesced and will no longer be watery.
  3. Set oven rack in middle position, and pre-heat oven to 350F. Line baking sheet with parchment paper or nonstick silicone baking mat.
  4. Using 1-inch ice-cream scoop, firmly pack coconut batter into the scoop, pressing the flat side against the side of the bowl to flatten. Arrange the scoops 1 to 2 inches apart on baking sheet. (I find you also need to neaten the bottom edges of the scoops if you want neat and beautiful-looking macaroons. I did not do that and mine had jagged edges, not that we minded that!)
  5. Bake until macaroons turn speckled golden brown, 10 to 13 minutes. The macaroons should still be soft and moist in the center.
  6. Cool baking sheet on wire rack for 10 minutes, then remove with metal spatula and let cool completely on wire rack.
  7. If chocolate glaze hardened, heat it in double-boiler until pourable (I used a water-bath, closely watched). Line a baking sheet with parchment paper. Dip macaroons in glaze to your fancy- the original recipe instructed to dip the bottom 1/4-inch of the macaroons, I did a little bit of everything.  Set macaroons, bottoms down, on parchment-lined sheet, and let dry completely (it will take about 3 hours).
Chocolate Glaze
12 oz semisweet chocolate, chopped into 1/2 inch pieces
2 Tbs vegetable oil
To make the glaze: Place the chopped chocolate in the top of a double boiler set over simmering water and heat until melted.  Remove from the heat and stir in the vegetable oil.  Let stand until cool but still fluid. 


Tuesday, December 4, 2012

Pumpkin Hazelnut White Chocolate Biscotti

Looking for a new treat to bring in to work over the past weekend, I stumbled upon this delicious recipe on Pinterest.  This breakfast cookie is a perfect combination of hazelnut, white chocolate and pumpkin and proved to be a perfect pair with my morning coffee, making working the weekend that much better.  This recipe was adapted from Skinnytaste.com and for an extra kick I dipped about half of them in white chocolate (maybe not so skinny, but tis the season!)

Ingredients
Serving: 28-30
2 cups all purpose flour
2 1/2 tsp pumpkin pie spice
1 1/2 tsp baking powder
1/4 tsp cinnamon
1/4 tsp nutmeg
pinch of course salt
1/2 cup crushed hazelnuts
1/2 cup white chocolate chips
2 tbsp unsalted butter at room temperature
3/4 cup sugar
2 tbsp pure canned pumpkin
2 large eggs room temperature
1 tsp vanilla extract

Optional: 1 cup white chocolate chips

Preheat oven to 375.  Place baking mat on baking sheet.

Combine flour, pumpkin spice, baking powder, cinnamon, nutmeg and salt in a medium bowl and mix together. Add hazelnuts and chocolate chips.

In a standing mixer with the paddle attachment, mix butter and sugar on medium for 2 minutes.  One at a time, add pumpkin, eggs and vanilla.  Reduce mixer speed to low. Add dry ingredients until just combined.

Remove dough and divide in two.  Form into a two long flat logs (12inches long, 2 inches wide). Place on prepared baking mat and bake for 22-25 minutes.

Remove from oven and let cool for 10 minutes. Using a serrated bread knife, cut loaf into 1/2 inch pieces at a diagonal. Place pieces on baking mat and bake on each side for another 3-4 minutes.

**Optional: with a double broiler, melt the white chocolate chips, stirring constantly until all chips are melted. Dip cooled biscotti in chocolate and let dry on baking rack.

Monday, December 3, 2012

Chocolate-Ginger Brownies

These brownies are fabulous.  The rich chocolate combined with the zing of ginger, make the perfect treat to get you in the mood for the holidays.  The preparation takes no time at all.  In fact, you do not even use a mixing bowl. Simply melt the butter and chocolate on the stove and then add all of the ingredients into the same saucepan.  Yay for fewer dishes :) 

Chocolate-Ginger Brownies - Recipe from Martha Stewart

Ingredients
1/2 cup (1 stick) unsalted butter, plus more for baking dish
3 ounces bittersweet chocolate, coarsely chopped
1 cup sugar
2/3 cup all-purpose flour
1/4 cup unsweetened Dutch-process cocoa powder
2 large eggs
1 teaspoon grated peeled fresh ginger
1/2 teaspoon pure vanilla extract
1/2 teaspoon ground nutmeg
1/2 teaspoon ground ginger
1/4 teaspoon coarse salt
1/8 teaspoon ground cloves

Directions
  1. Preheat oven to 325 degrees. Butter an 8-inch square baking dish. Line bottom with parchment paper, allowing 2 inches to hang over 2 sides. Butter parchment; set aside. Melt butter and chocolate together in a medium saucepan over medium-low heat, stirring until smooth. Remove from heat, and stir in remaining ingredients.
  2. Pour batter into prepared dish. Smooth top with a rubber spatula. Bake until a cake tester inserted into center comes out with moist crumbs, 30 to 35 minutes. Let cool in pan on a wire rack 15 minutes. Lift out, and let cool completely on rack. Cut and enjoy.

Sunday, December 2, 2012

Evergreen Swag

During our most recent trip to the Home Depot, I was reminded how much I love the smell of Christmas trees. The scent is a reminder of the Christmas season and all of the good memories that come with it.  We purchased our Christmas tree that morning, and before the "tree guys" wrapped our tree in netting, they cut off the lower branches and threw them in a big box. I asked the guy if I could take the branches and he said, "Of course, and if you are interested, there is a hole box of branches over there!" I got excited and grabbed a couple (understatement) of branches to bring home and place around the house so the entire house would smell like Christmas.


Head to your local Home Depot, or favorite purveyor of Christmas trees and ask for their unused branches. It is such a fun and free way to decorate and bring the spirit of Christmas into your home. 

Saturday, December 1, 2012

Felt Christmas Trees

In a quest to find the perfect pink snow boots for my toddler, I took both of my girls to Landsend.  After an embarrassing 15 minutes in the store (tantrums were thrown by both me and my toddler, because they did not carry toddler sizes in the store) we got  back in the car with tear streaked cheeks and headed home.  The one thing I did take home from Landsend was a great idea for Christmas decorations.  Throughout the store, there were styrofoam treas covered in brightly colored felt.  They looked playful and cheerful and most importantly, they looked easy to make :)
I found everything I needed at Michael's and it took me about an hour to make my very own felt tree forest.  I stuck to a red/aqua color scheme, so I could use them as decorations for my daughter's upcoming first birthday party. My trees are whimsy (sticking with the 1 year old birthday party theme), but you can make them fancy or more fun by adding different embellishments like rhinestones, other fabric, ribbon, real ornaments etc.  


Supplies:
Styrofoam Cones - whatever size you want
Hot glue gun and glue
Felt in 8x11 sheets or by the yard
Embellishments of your choice

Instructions:
Wrap the Styrofoam tree in colored felt and affix it to the foam with hot glue.  Add other embellishments as desired, using hot glue.  Display throughout the house!


Friday, November 30, 2012

25 days of Christmas

In the spirt of Christmas this season, we thought it would be a fun idea to do 25 posts for the 25 days of Christmas.  We can't promise that it will happen but we sure can try!
Our blog has been such a great way for us to share recipes and project ideas with family and friends and it will be even more fun and special to do so during the holiday season.
Please message us with comments/ideas/recipes of your own - we love learning and trying new things!

Wednesday, November 28, 2012

wine cork board

Last year, when I was decorating my (old) apartment, I was looking for an inexpensive/functional item to hang by the door. After being inspired by my Grandpa, who made trivets from old corks, I thought I would try a cork board - so I could hang reminders, pictures and recipes.  Luckily I had been accumulating corks for awhile with the help of friends, family and local restaurants.  I loved the board so much, that I made this one below as a gift for a friend.  (Hint...great homemade Christmas gift!)

Items you will need: frame, corks (who doesn't have a ton if old corks?!), hot glue gun and a box cutter.  For the frame I went to goodwill, sanded it down and then repainted it with acrylic paint from Micahel's.  Or you can find a frame you like as is.


 Putting together the cork board is like a puzzle.  I put several corks on the board at a time and then tried to make them fit according to size. I did a standard design, but you can always be more creative.


 Use the hot glue gun to glue the corks on the board


 Toward the end of the cork board, you may have to cut the ends off of the corks with a box knife so they fit snugly together. Try to do this prior to gluing on the board.


And your done!


Monday, November 19, 2012

Homemade Apple Sauce

I have always wanted to make homemade apple sauce and now I am wondering why it took me so long! It is easy and delicious, and I was able to add all of my favorite spices.  This is a recipe you can really tailor to your taste  (add or eliminate spices, sugar etc.).  The most time consuming part about the recipe is coring and peeling the apples - so if anyone has any tips or secrets I am all ears!

Ingredients:
4 pounds apples, such as McIntosh, Gala or Braeburn
1/4 cup lemon juice (2 lemons)
1/2 teaspoon ground cinnamon or 1 cinnamon stick
1/4 teaspoon nutmeg
1/4 teaspoon ginger
1/8 teaspoon cloves
3 teaspoon dark brown sugar ***


1. Peel, core and slice apples.
2. In a large pot, combine apples, lemon juice and spices in a big pot with 1 1/2 cups of water and bring to a boil. Reduce to a simmer, stirring occasionally, until apples are soft and falling apart; approximately 30 minutes.
3. Mash with potato masher until smooth with small chunks. Add sugar if using.
4. Let cool and store in an airtight container. ENJOY!

*** What is the difference between dark and light brown sugar?

Brown sugar is refined sugar + molasses. Molasses is what gives brown sugar its rich, deeper flavor and makes it more moist.  Dark brown sugar has more molasses and light brown sugar has less.

Most recipes do not specify the different type of brown sugar, but if they do it is because they are trying to achieve a specific taste or flavor in the recipe.  Dark brown sugar brings more a slightly bitter molasses taste - ie Gingerbread, where as light brown sugar is more of a subtle flavor. These two sugars are generally interchangeable so use whatever you have on hand. Make sure to try both in recipes to figure out what you like best!

Saturday, November 17, 2012

Stuffed Red Peppers with Quinoa

I have been trying to eat a little healthier with the holidays approaching and found this recipe in Everyday Food: Light. Quinoa is one of my new favorite staples, described often as a nutritional powerhouse and an excellent source of protein. I have now made this dish several times and each time I like it more and more. The recipe in the book doesn't call for any meat, but I added some chicken sausage to give it added flavor and protein. The stuffed peppers pair well with brussel sprouts or other greens.

Stuffed Red Peppers with Quinoa 
Serves: 4 Prep: 35 minutes: Total time: 1 hour 

Ingredients:
4 red bell peppers
1 tablespoon olive oil
1 medium onion, finely chopped
2 garlic cloves
1 teaspoon ground coriander
Coarse salt and ground pepper
1 cup quinoa, rinsed
1/2 cup fresh flat-leaf parsley leaves, coarsely chopped
1/3 cup walnuts, coarsely chopped
1 cup coarsely graded provolone, mozzarella or swiss cheese ( 4 ounces)
3 spinach and garlic chicken sausages, diced

1. Preheat oven to 450 with rack in the upper third. Slice a very thin layer from the base of a bell pepper so it sits upright. Slice of the top, just below the stem and remove the ribs and seeds from top and bottom parts. Repeat with remaining peppers. Reserve bottom of peppers and dice.

2. Cook quinoa according to directions (1 cup quinoa to 2 cups of water).  Meanwhile in a medium saucepan, heat oil over medium. Add onion, garlic coriander, chopped pepper tops and chicken sausage; season with salt and pepper. Cook, stirring occasionally, until onion has softened (5 min).  Remove from heat.

3. Once quinoa is finished, combine with onion mixture. Stir in parsley, walnuts and 3/4 cup cheese.; season with salt and pepper.

4. Place pepper in a baking dish and divide quinoa mixture evenly among peppers. Bake for 15-20 minutes or when peppers are tender. Top evenly with remaining 1/4 cup cheese; bake until cheese melts approx. 10 minutes. Serve warm. 


Friday, November 16, 2012

fall table decor - from your backyard

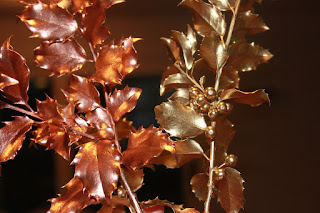
We are having a pre-Thanksgiving dinner party next week and I have been trying to figure out how I am going to decorate the tables.  I am ready to move on from the orange glow of Halloween and embrace the fall harvest colors of brown, copper and gold.  I am trying to be practical, because as soon as Thanksgiving is over, the dozen boxes of Christmas fun will make their way up from the basement.  So....I decided to take my orange pumpkins, gourds and other fall finds from the back yard (leaves, branches etc) and spray paint them with metallic paint.  It took longer to gather the leaves than it did to paint all of them.
I used Rust-oleum metallic finish spray paint in copper and gold, which you can find at most hardware and "big box" stores.  I am thinking about sticking the branches in my floral arrangements and the leaves and pumpkins will just be scattered on the table.  Next to do: Plan the menu :)