Monday, March 30, 2015

Carrot Cake Muffins

I have been OD-ing on all things EGG.  Chocolate eggs, peanut butter cup eggs, cadburry eggs. malted milk eggs.  

I need to get a grip, which is why I made these low sugar, low fat and vegetable packed carrot cake muffins today.  I am proud to report that my afternoon ended up being an eggless one :)

Carrot Cake Muffins (Adapted from Martha Rose Schulman - The NYT)

Ingredients
2 ½ cups whole-wheat pastry flour (I used 1 cup whole wheat flour and 1 1/2 cups AP flour)
2 teaspoons baking powder
1 teaspoon baking soda
2 teaspoons ground cinnamon
1 teaspoon freshly grated nutmeg
½ teaspoon ground allspice
½ teaspoon ground cloves
½ teaspoon salt
2 eggs
⅓ cup raw brown (turbinado) sugar
⅓ cup canola oil
1/4 cup unsweetened applesauce
1 ⅓ cups buttermilk
1 teaspoon vanilla extract
⅔ cup golden raisins tossed with 1 teaspoon unbleached all-purpose flour, or 2/3 cup chopped pecans
1 ½ cups grated carrots
3/4 cup sweetened coconut

PREPARATION
Preheat the oven to 375 degrees with the rack in the upper third of the space. Oil or butter muffin tins.
Sift together the whole-wheat pastry flour, baking powder, baking soda, spices and salt.
In a separate bowl, beat together the eggs, sugar, oil, buttermilk, applesauce and vanilla. Using a whisk or a spatula, stir in the dry ingredients and mix until well combined. Do not beat; a few lumps are fine, but make sure there is no flour at the bottom of the bowl. Fold in the coconut, raisins or pecans and the carrots.

Spoon into muffin cups, filling them to just below the top (about 4/5 full). Place in the oven, and bake 25 minutes until lightly browned and well risen.

Thursday, March 26, 2015

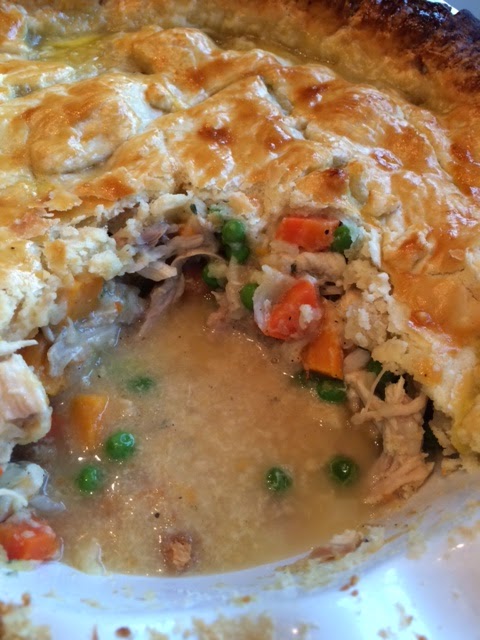
Chicken Pot Pie


Spring was here for a moment, and now it is gone.   We have had snow 3 times this week and I refuse to shovel...it WILL melt...right?!  

If you need a little extra comfort during this last stretch of winter, this family friendly recipe is a winner.  I received the book "Dinner: A Love Story" from a friend and I absolutely love reading it (Yes, not just cooking from it, but reading it).  The book is full of personal stories, notes and family mementos. Reading it makes you feel good, even if you have been trapped inside for the past 5 months.  

Chicken Pot Pie
Recipe from: Dinner: A Love Story
Makes one 10-inch pie; serves 4-6

Ingredients:

1 cup chicken stock
1 small sweet potato, peeled and diced
1 medium carrot, peeled and chopped
1/2 medium onion, chopped
The leaves of a few sprigs of thyme (optional)
Salt and pepper to taste
1/2 cup milk
2 tablespoons flour
2 cups cooked chicken (we roasted a bone-in breast with olive oil, thyme, salt and pepper; then pulled off the meat)
1/3 cup frozen peas
1 ready-to-bake pie crust (recipe below)*
1 egg, lightly beaten

Directions:
Preheat the oven to 425 degrees.

In a medium saucepan, bring the broth to a boil and add the chopped sweet potatoes, carrot, onion and thyme. Salt and pepper all over. Simmer the mixture for 15 minutes, or until the vegetables are soft.

Meanwhile, in a small bowl, combine flour and milk. When the veggies are soft, add this flour-milk mixture to the pan slowly, stirring until everything thickens. Remove pan from heat and add chicken and peas.

Add the pie filling to a 10-inch pie plate and cover with your pie crust. Cut a few slits on top to allow steam to escape while baking. Using a pastry brush, paint the beaten egg all over the top to give things a nice golden sheen.

Bake for 25 to 30 minutes, until filling looks bubbly inside.


Monday, March 9, 2015

Brown Butter Blondies

The absolute last thing I should be doing before a beach vacation is baking. I should be packing, juicing, getting a  pedicure, but instead, I made a a mouth-watering dessert.  These brown butter blondies are to-die-for. They are chewy, rich and extremely addicting.  Please try them.  You will not be disappointed. 

Brown Butter Blondies 
(FOOD 52.com)

2sticks (1 cup) unsalted butter
2cups all-purpose flour
1heaping teaspoon kosher salt
2eggs
4teaspoons good-quality vanilla extract
1 3/4cups dark brown sugar
1cup bittersweet chocolate chips

Melt the butter in a medium-sized saucepan. Swirl it around a few times. It will foam and spatter. After 3 to 4 minutes, it will start to smell nutty. Don’t walk away. It’s ready when the sizzling quiets down and you see little brown bits drop to the bottom of the pan. Pour into a large bowl. Cool completely (about 30 minutes). Alternatively, if you want a blondie marbled with chocolate, cool butter for only 5 minutes and proceed with the recipe. The warm dough will melt the chocolate chips a bit.
Heat oven to 350° F. Prepare your 8 by 8-inch baking pan with butter and flour, parchment paper, or aluminum foil. Set aside.

Whisk together flour and salt. In another bowl, whisk together eggs and vanilla. Set aside.
Add brown sugar to the cooled butter. Mix with a wooden spoon for about a minute.
Add egg/vanilla mixture to butter/sugar mixture. Mix until combined and shiny, about 20 seconds.
Add flour mixture to the butter/sugar/egg mixture. Mix until there are still a few pockets of flour visible. Add chocolate chips. Mix until evenly distributed and all flour pockets are gone, but be careful not to over-mix! Spoon dough into your prepared baking pan. Spread evenly with the back of your wooden spoon (it will keep its shape). Bake for 25 to 30 minutes. You can’t do the toothpick test with this because it always comes out clean. Instead, look for a crispy top that's just starting to crack.

Firm slightly-browned edges. And when you press on the center, you don’t want it to feel really soft. Don't stress. You can always throw it back in later. Just know that once it's cool, it will firm up quite a bit. And once frozen, it is dreamy in all forms.

Remove from the oven. Cool completely before removing from the pan. The blondie block should pop right out (either pull out by parchment/alumninum foil or if in a greased pan, just invert onto a cutting board and carefully flip it back over). Cut into desired portion sizes. These keep for a few days at room temperature in an airtight container. Or you can freeze them for a few months.

Wednesday, February 4, 2015

Skinny Chicken Parm


It has been ages since I have posted. I wish I had a good excuse, but I don't.
I have been LAZY, LAZY, LAZY.

This recipe isn't super exciting, and it isn't anything new, but it was DELICIOUS and HEALTHY - 2 things that do not always go hand in hand.  The whole family loved it, which is why it will become a new kid-friendly staple in our house.

The recipe is from Skinnytaste.com.  Sorry the pic is so crappy.  The lighting was terrible, bc it is always dark/cloudy during our Wisco Winters.


Baked Chicken Parm

4 (about 8 oz each) chicken breast, fat trimmed, sliced in half to make 8
3/4 cup seasoned breadcrumbs
1/4 cup grated Parmesan cheese
2 tbsp butter, melted (or olive oil)
3/4 cup reduced fat mozzarella cheese
1 cup marinara 

cooking spray
Directions:
Preheat oven to 450°. Spray a large baking sheet lightly with spray.

Combine breadcrumbs and parmesan cheese in a bowl. Melt the butter in another bowl. Lightly brush the butter onto the chicken, then dip into breadcrumb mixture. Place on baking sheet and repeat with the remaining chicken.Lightly spray a little more oil on top and bake in the oven for 20 minutes. Turn chicken over, bake another 5 minutes.

Remove from oven, spoon 1 tbsp sauce over each piece of chicken and top each with 1 1/2 tbsp of shredded mozzarella cheese. Bake 5 more minutes or until cheese is melted.


Thursday, January 8, 2015

Orange, Carrot, and Ginger Juice

With one month left to go in my pregnancy (yay!!) vegetables are the last thing that I want to eat.  I feel like I am a kid again and have to basically force myself to eat them.  So instead I brought out the juicer and have been trying to get my vegetables via juice. This is a great, refreshing morning juice, with seasonal fruits. Orange vegetables are loaded with beta-carotine which can help the health of your skin, eyes and boost your immune system loaded with Vitamin C and A.

2 naval oranges
3-5 large carrots
1 small square of ginger, peeled

 Juice ingredients using a juicer and ENJOY!

Wednesday, October 29, 2014

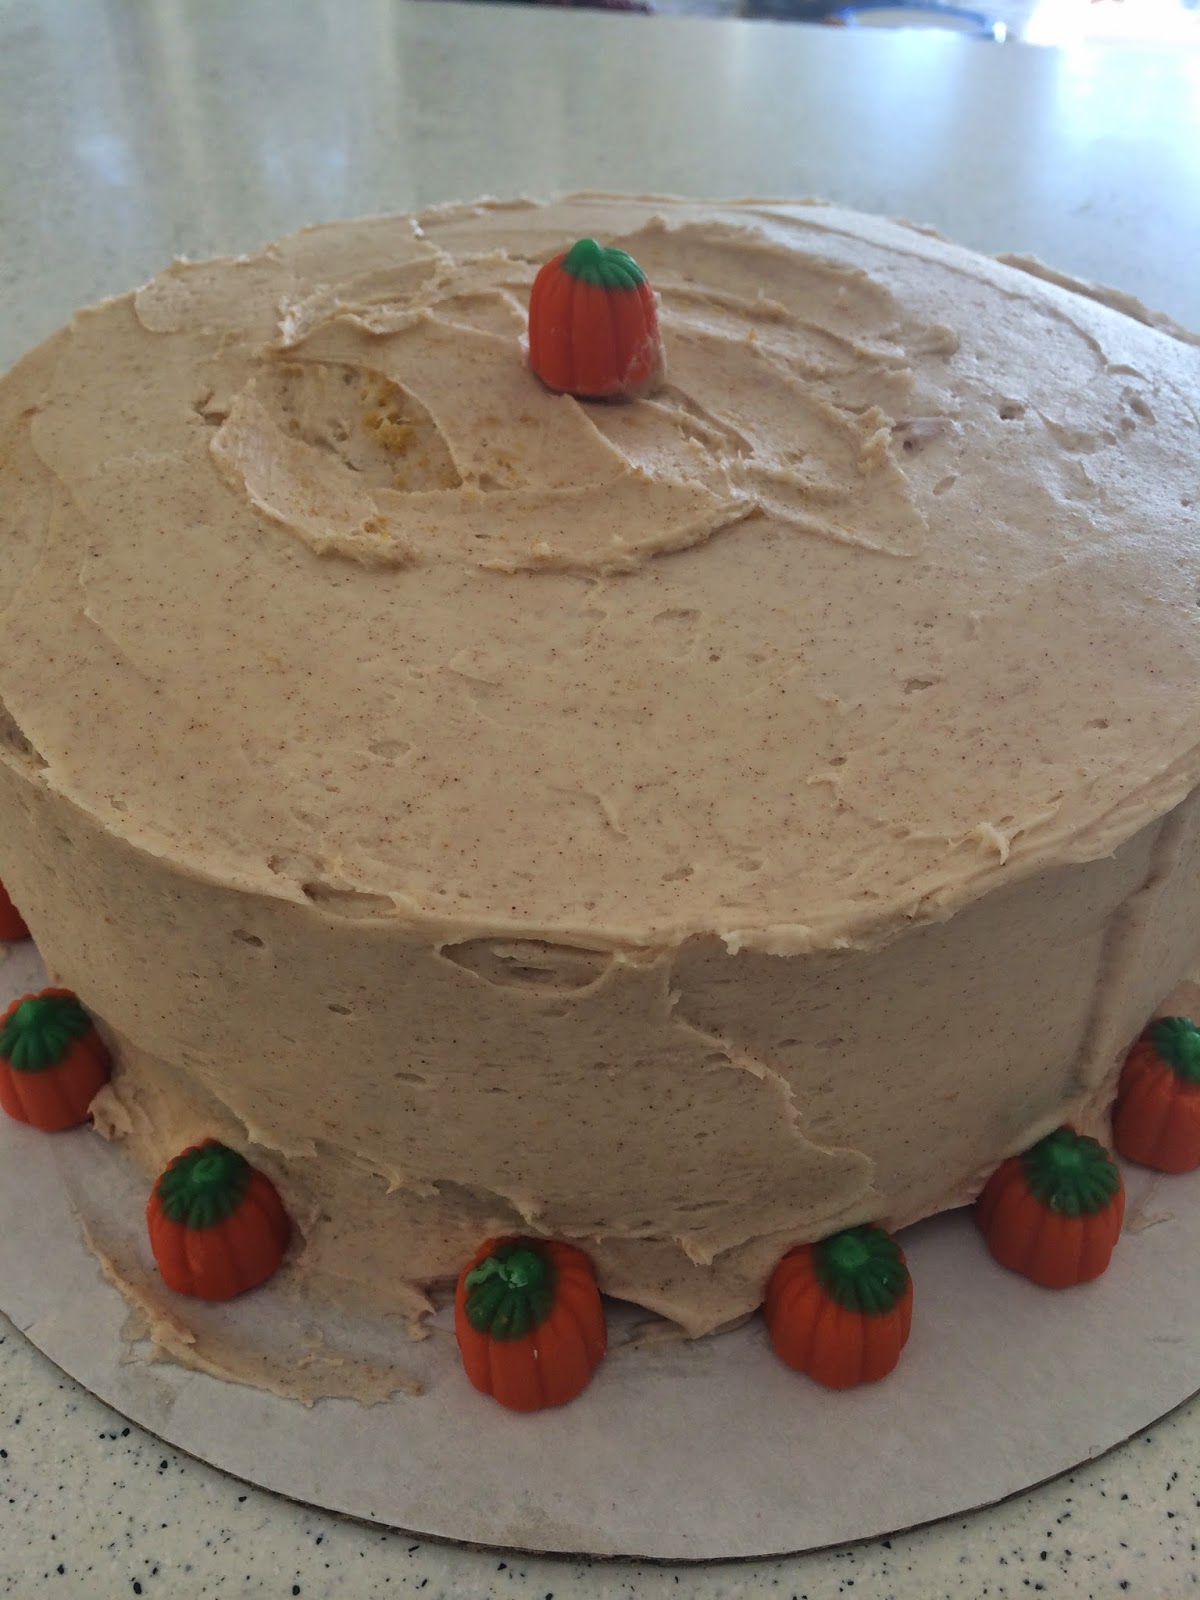
Pumpkin Dream Cake

I pinned this on pinterest a while ago, hoping that I would have an occasion to make it, and thankfully Bridget made that happen :)  We had a baby shower for her last weekend to celebrate the mom-to-be and baby boy due this winter!  It was great to see family and friends and the weather couldn't have been nicer.

We went with a pumpkin theme for the shower, so the cake was the PERFECT dessert.

The Dream Cake is not hard to make and it is exceptionally delicious (IT HAS MAPLE CREAM CHEESE FROSTING - HOW CAN IT GET ANY BETTER?!) It would be the perfect dessert to bring to a Thanksgiving feast or serve at a fall soiree!


Pumpkin Dream Cake with Maple Cream Cheese Frosting - The Novice Chef

Ingredients
3 cups all-purpose flour
1 1/2 teaspoons baking soda
1/2 teaspoon salt
3/4 cup unsalted butter, softened
2 cups granulated sugar
3 large eggs
1 tablespoon vanilla extract
1 (15 oz) can pumpkin
1/4 cup vegetable oil
1 cup milk

12 oz (1 1/2 packages) cream cheese, softened
3/4 cup unsalted butter, softened
3 tablespoons pure maple syrup
2 teaspoons vanilla extract
2 teaspoons cinnamon
6 cups powdered sugar
directions:


Preheat oven to 300°F. Grease 3, 8-inch round cake pans (I used two 9-in Pans). Set aside.

In a medium bowl, mix flour, baking soda and salt. Set aside.

In a large bowl/stand mixer, cream butter and sugar until light and fluffy. Beat in the eggs one at a time, then stir in vanilla, pumpkin and vegetable oil. Beat in the flour mixture alternately with the milk.

Divide batter evenly into prepared pans. Bake for 35-40 minutes, or until a toothpick inserted into the center of the cake comes out clean. Remove pans from oven and immediately place in freezer for 45 minutes. (This keeps the cake moist by immediately stopping the baking so the cake does not continue to bake when you remove it form the oven.)

For the frosting: In a large bowl, cream butter and cream cheese until smooth. Beat in maple syrup, vanilla and cinnamon. Add confectioners' sugar and beat on low speed until combined, then on high until frosting is smooth.

Assemble the 3 layers with a thick layer of frosting in between each layer. Then apply a thin crumb coat on the top and sides. Pop back in the freezer to harden the crumb coat for about 10 minutes.

Apply one final thick and even layer around the outside of the cake. Store in the fridge until ready to serve.


Wednesday, October 22, 2014

Pumpkin No Bake Energy Bites

These bites are awesome. My kids eat them for dessert and they are a healthy, energy packed snack for me.  I cannot get enough of pumpkin this time of year and these little nuggets do the trick.


Pumpkin No Bake Energy Bites - Gimmesomeoven.com

8 oz. (about 1 packed cup) chopped dates
1/4 cup honey
1/4 cup pumpkin puree
1 Tbsp. chia seeds or flax seeds
1 tsp. ground cinnamon
1/2 tsp. ground ginger
1/4 tsp. ground nutmeg
pinch of salt
1 cup old-fashioned oats (dry, not cooked)
1 cup toasted coconut flakes
1 cup toasted pepitas (pumpkin seeds)

Combine the dates, honey, pumpkin puree, chia (or flax) seeds, cinnamon, ginger, nutmeg and salt in a food processor, and pulse until smooth and combined.

Transfer the mixture to a large bowl, and stir in the oats, coconut flakes and pepitas until evenly combined. Cover and refrigerate for at least 30 minutes.

Once the mixture is cool (and easier to work with), use a spoon or cookie scoop to shape it into your desired size of energy balls. (Mine were about 1-inch in diameter.) Alternately, you can line a small baking pan with parchment paper, and press the mixture evenly into the pan, let it cool, and then cut into bars.

Store covered in the refrigerator (I actually put mine in the freezer) for up to 2 weeks.